Documentation
Navigation
Overview
Welcome to the documentation page for the MotionMaster 3D addon for Blender. This addon is packed with features designed to speed up your workflow while also introducing brand new tools, some of which are highlighted on the homepage.
As you go through this documentation, we recommend testing the features directly in Blender to get hands-on experience and a better understanding of how they work. If you encounter any issues, please use the support or contact page for additional help.
Installation
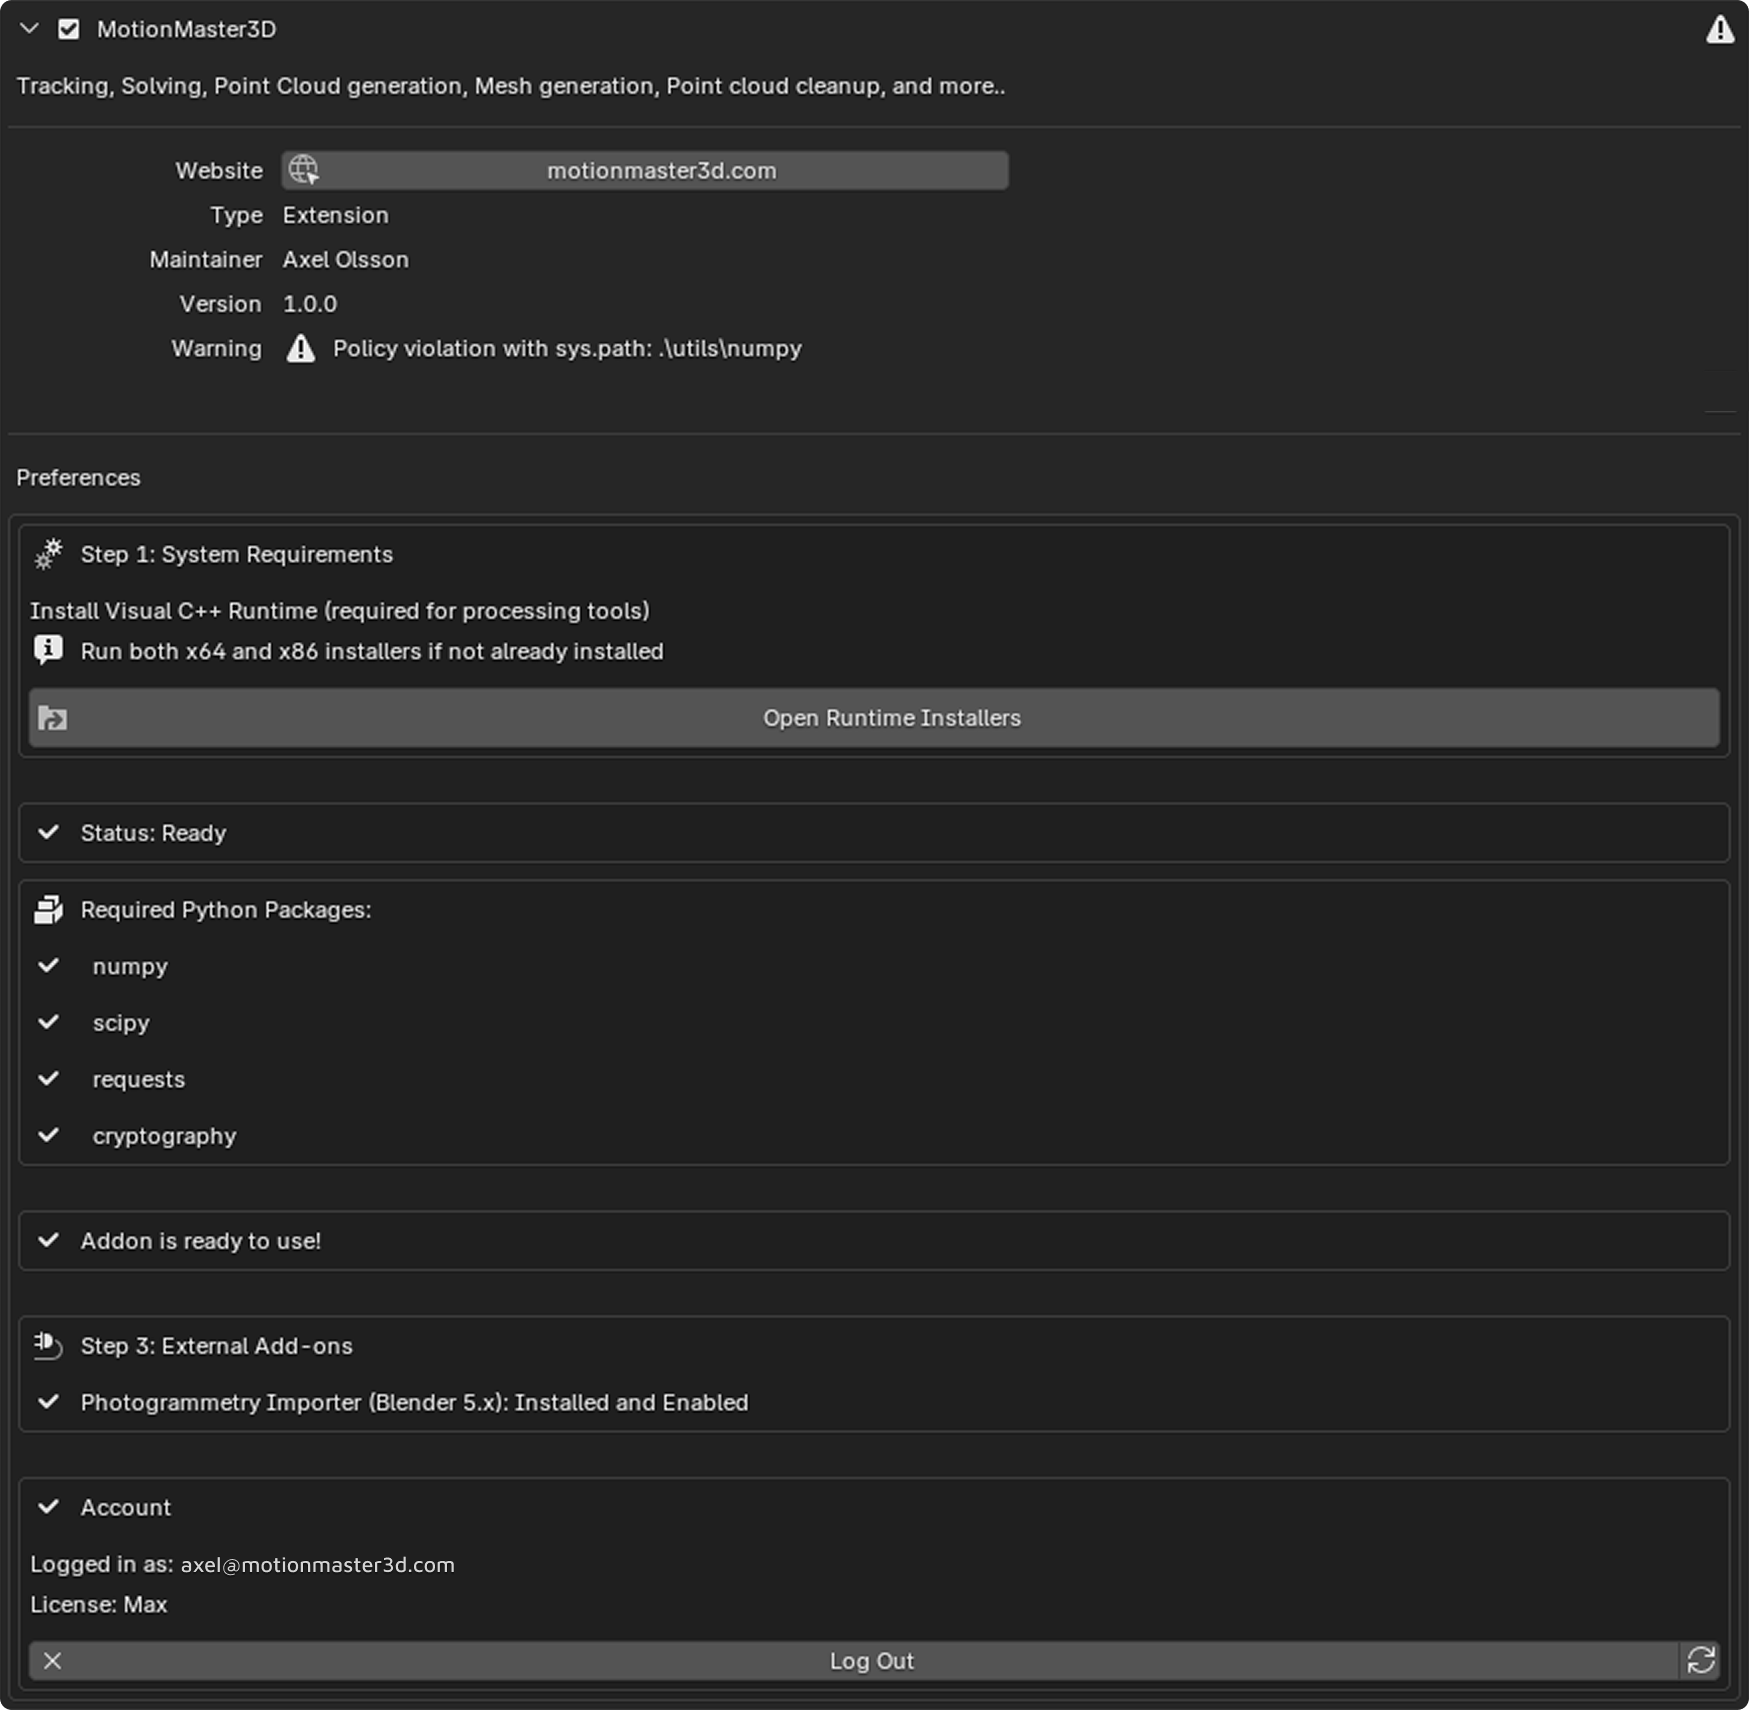
Once you purchase the addon, you will receive a zip file just like any other Blender addon, which you should not unzip. After it is downloaded, go into Blender and open the preferences (Edit → Preferences). Then go into the Add-ons section and click on the little dropdown arrow, and click "Install from Disk". Your file explorer should open where you need to navigate to the addon zip file you just downloaded, select it, and click "Install from Disk". After that is done, the "MotionMaster 3D" addon will show up when you search for it in the Add-ons page. Make sure to enable it by clicking the checkbox. Now there are a few steps that you need to carefully follow:
Step 1: System Requirements
Click on the "Open Runtime Installers" button, which will open a folder containing Visual C++ runtime installers. These are required to run the processing tools (COLMAP, GLOMAP, and OpenMVS), which are compiled with Visual Studio. Important: Run both installers:
- • VC_redist.x64.exe (64-bit)
- • VC_redist.x86.exe (32-bit)
If you already have these installed on your system, the installer will tell you and you can simply close it. If you skip this step and don't have the redistributables installed, the addon's processing tools will fail to run.
Step 2: Python Dependencies
The addon requires several Python packages to function. You will see a list showing the status of each package (numpy, scipy, requests, cryptography). If any packages show an ✗ (not installed), click the "Install Python Dependencies" button. The addon will automatically download and install the required packages. After installation completes:
- • If you see "Dependencies installed successfully!" with a message to restart Blender, save your work and restart Blender.
- • If you see "Addon is ready to use!", you can proceed to the next step.
Step 3: External Add-ons
The addon requires the Photogrammetry Importer addon for importing reconstruction data into Blender. Click the "Install Photogrammetry Importer for Blender X.x" button (where X.x matches your Blender version). The addon will automatically install and enable the Photogrammetry Importer. Once installed, you will see a checkmark indicating "Installed and Enabled".
Step 4: Account Login
After completing the above steps, you will see an Account section at the bottom of the preferences panel. Enter your email and password that you used when purchasing the addon, then click "Log In". Once logged in, you will see your email and license type displayed, confirming the addon is fully activated and ready to use.
After installation, the addon panel will appear in the 3D viewport on the right-hand side (N-panel), in the standard location for Blender addons.
Panel Overview
Inside the panel, you will see many options that may look intimidating at first. However, this documentation will guide you step by step, and you will find the interface intuitive once you understand the structure.
The addon includes a total of 10 panels (11 if you count the Progress panel): (Progress), Account, Feedback & Support, Select Footage, Batch Processing, Import Results, Quick, Heavy, Point Cloud Cleanup, Aligner, and Reset. You can collapse panels you are not currently using to keep the interface clean.
Each panel has its own dedicated section in this documentation, with detailed explanations of their features. In this overview, we will briefly introduce what each one is used for.
Short Breakdown of Each Panel
- • (Progress): Shows the progress of the currently running operator in real time.
- • Account: Allows the user to log in and see their license type as well as adjust their email notifications.
- • Feedback & Support: Allows the user to send bug reports, feature requests, questions, and other messages directly to the MotionMaster 3D team.
- • Select Footage: Allows the user to select one footage to operate on or convert.
- • Batch Processing: Allows the user to select multiple footages and multiple operators to be executed in a batch.
- • Import Results: Allows the user to import previously generated tracking results into the scene.
- • Quick: Does real-time camera autotracking on the current footage.
- • Heavy: Does precise camera autotracking, dense point cloud generation, or mesh generation on the currently selected footage.
- • Point Cloud Cleanup: Allows the user to perform point cloud cleanup on a point cloud.
- • Aligner: Aligns results to the ground correctly.
- • Reset: Removes all files from a folder except for the image sequence(s).
Medium Breakdown of Each Panel
(Progress Panel)
The name of this panel is in parentheses because it is only used to show the current progress of the currently running operation and therefore does not provide any actual operations.
Account Panel
Lets the user log in to activate their machine and use the addon. It also allows the user to specify which email and notification settings they want to use (if their license includes this).
Feedback & Support Panel
In this panel, you can send bug reports, feature requests, questions, or other messages to the MotionMaster 3D team. You will also see your sent messages on the "Feedback & Support" page on this website.
Select Footage Panel
This is probably the first panel you will interact with when starting a new project. Here, you define the footage you want to work with. The footage can be either a video or an image sequence.
For the addon to work properly, you need to convert your video into an image sequence using the Video or Sequence Converter. This tool can also downscale an existing image sequence to a lower resolution, which speeds up the processing step.
This panel also includes the Batch Mode toggle, which allows you to specify an output folder and select multiple footage folders for the addon to process at once, reducing manual work.
Batch Processing Panel
In this panel, you begin by defining an output folder where your results from the different sequences will be stored. Then you either manually select each footage individually or enable the "Watch Folder" option, which allows you to specify a watch folder that will use all the sequences in that folder. You can then decide which operations you want to perform on the input footages, and when ready, click Start Processing. The addon will use the settings from those operator panels and perform those operations on each footage.
Import Results Panel
The Import Results panel provides a standalone way to import tracking results into your Blender scene. This is useful when you want to import results that were generated in a previous session, or when you need to re-import results without re-running the tracking process.
Simply select a result folder, and the panel will automatically detect available Quick Autotrack, Heavy Autotrack, and Mesh results. You can select which results to import and configure options like Smart Importer (for accurate camera animation) and whether to include dense point clouds.
Quick Panel
The Quick panel provides one of the two camera tracking solutions available in MotionMaster 3D. It lets you enter camera intrinsics such as focal length and sensor width, which are then used for live camera tracking.
At the bottom of this panel, you will find the Focal Length Estimator, which attempts to calculate the focal length from selected frames based on the given sensor width.
You can also configure performance and viewer settings here. Additionally, you can choose whether the addon should track forward, backward, or both, and then merge results to avoid frames without a camera solve.
Heavy Panel
The Heavy panel contains a more stable and versatile camera tracking solution. It uses a custom CUDA-compiled version of GLOMAP together with COLMAP to deliver the best possible tracking results.
This panel includes numerous parameters you can adjust, all explained in detail in the dedicated section of the documentation. It also offers mesh generation, with adjustable quality settings depending on how much time you are willing to wait.
Point Cloud Cleanup Panel
This panel offers a point cloud noise remover that removes unwanted points in point clouds. It uses the Statistical Outlier Removal (SOR) algorithm, where you can change the aggressiveness and neighboring count to alter how the algorithm behaves.
This is a quick way to clean up your point clouds and removes most of the manual work.
Aligner Panel
The Aligner panel is used after tracking your footage and, if applicable, generating meshes. It includes the Floor and Flip tools:
- • Floor orients the point cloud so that the selected points lie flat on the XY plane, snapping the solution to Blender's ground floor.
- • Flip inverts the Z direction. If your solution is rotated incorrectly with the negative Z-axis pointing upward, pressing this button will correct it.
Reset Panel
The Reset panel allows you to clear everything in the current sequence folder. For example, if you want to remove old solutions from previous runs, you can use this tool to quickly clean the folder.
Conclusion
Now you have a general understanding of how each panel works in MotionMaster 3D. It is time to go deeper and actually understand what each button does, which will give you a good foundation to stand on. At the end, we will go through a couple of examples for you to try tracking yourself, with a guide of course.
Preferences Panel
The Preferences panel allows you to configure global settings for MotionMaster 3D, including paths to external tools, performance options, and default behaviors.
Click to enlarge
Account Panel
The Account panel is the first panel you will see in the panel hierarchy and also the only panel you will see when you are logged out from MotionMaster 3D. After you have logged in and your license is valid, you will see that all the other panels appear as well as the user preferences in the Account panel.
Login Controls
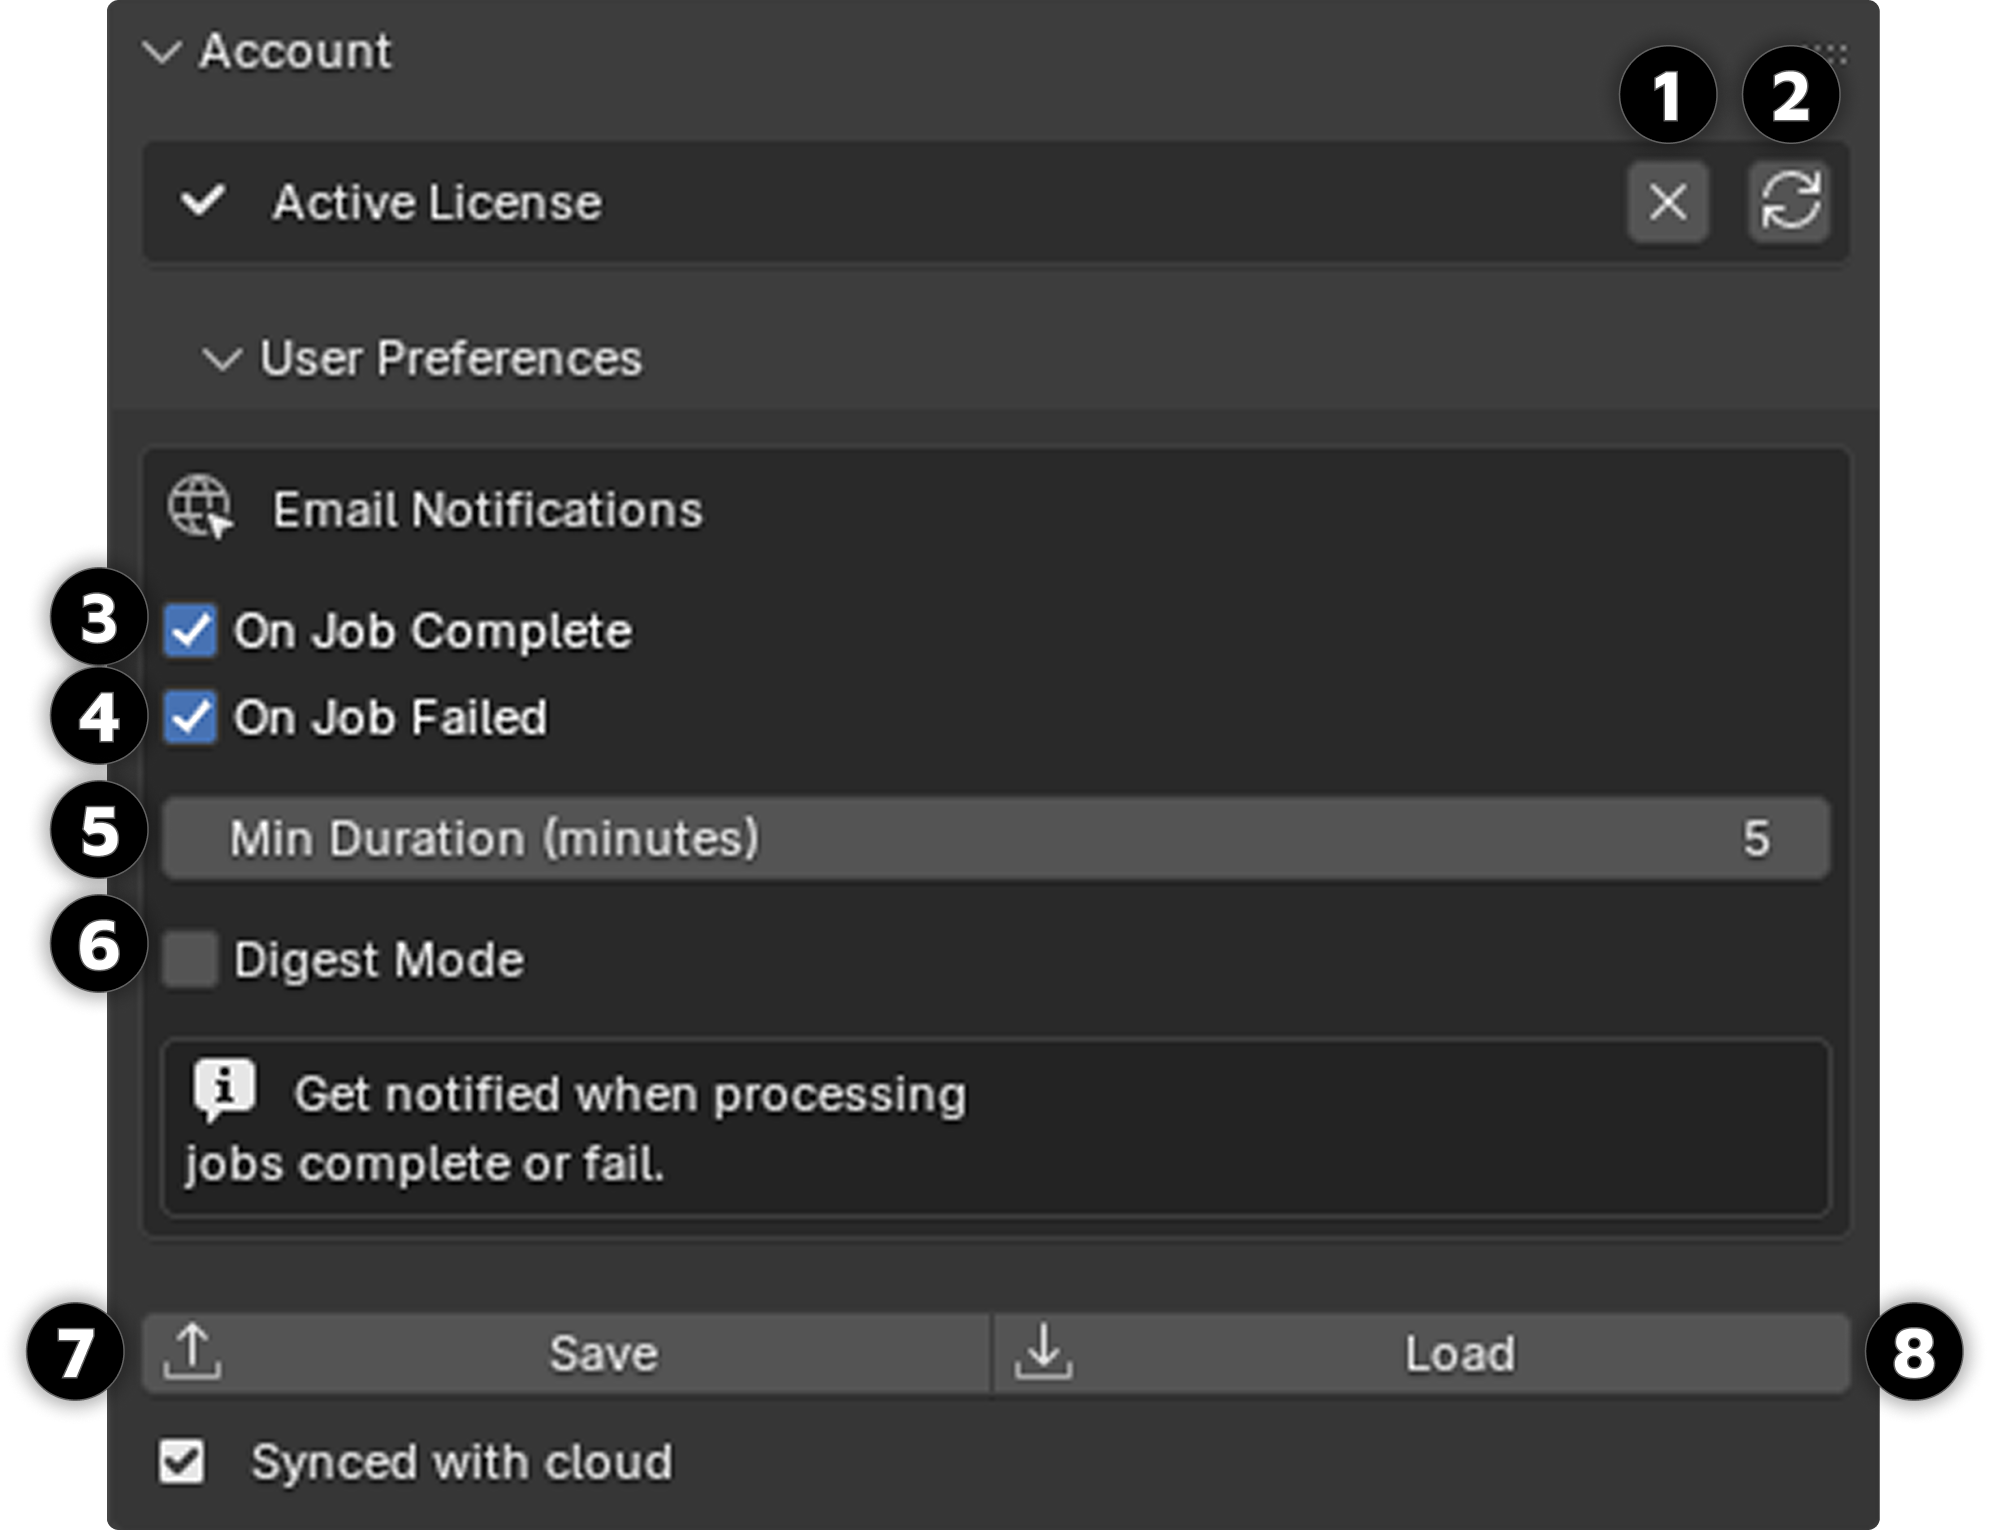
Buttons [1] and [2] allow you to either log out or refresh your license status. So if you upgrade your license and you want MotionMaster 3D to recognize that, you might need to refresh it by clicking [2] .
User Preferences
Next is the user preferences, and they are only relevant if your license includes things such as email notifications and general progress notifications (see the different license types). The available settings are:
- • On Job Complete [3] — When enabled, you will get an email whenever your current batch operation is done.
- • On Job Failed [4] — Sends you an email if the batch process fails.
- • Min Duration (minutes) [5] — Allows you to specify the minimum time for a batch process for you to get a notification when it is done.
- • Digest Mode [6] — Makes you get an email summary for multiple jobs instead of individual notifications.
Saving Settings
When the settings are how you like them, you can "Save" [7] them to the server, or you can "Load" [8] your previous settings and ignore your current ones. But for them to be activated, you need to make sure that the settings you want are stored.
Click to enlarge
Feedback & Support Panel
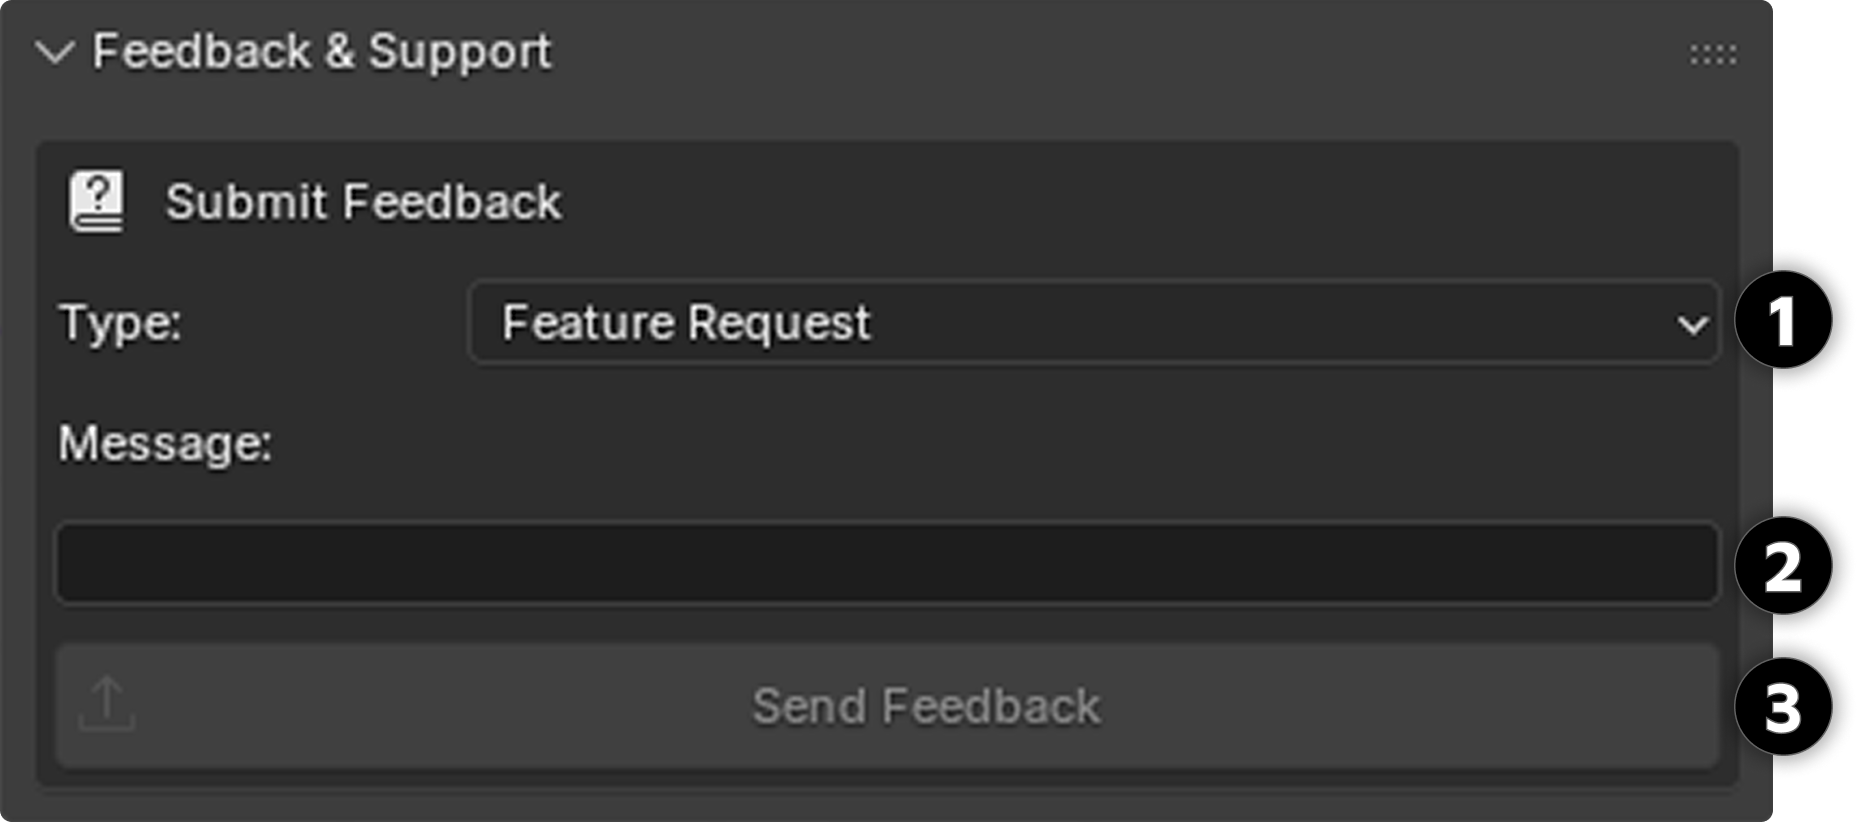
In this panel, you can decide which feedback type you want to send [1] , whether "Bug Report" if there are any bugs that you encounter and want to report, "Feature Request" for features you want to see in an upcoming update to the addon, "Question" for a general question (for example, how to use a specific feature), and lastly "Other", which can just be a random statement or something you want to tell the MotionMaster 3D team (for example, user feedback).
Write your text message in the text area [2] , and when you are done, you can submit the feedback [3] .
Your submitted messages will also appear on the "Feedback & Support" page on this website, so you can keep track of your conversations with the MotionMaster 3D team.
Click to enlarge
Import Results Panel
The Import Results panel provides a standalone way to import tracking results into your Blender scene. This is useful when you want to import results that were generated previously, or when you need to re-import results from a different session. The panel works with both batch processing results and regular workflow results.
Selecting a Result Folder
Start by selecting the folder containing your tracking results in the Result Folder field [1] . This should be either:
- • Batch processing output: The root output folder containing sequence result folders (e.g.,
mysequence_result) - • Regular workflow: The image sequence folder itself, which now contains result subfolders like
heavy_track_resultandquick_track_result
Once you select a folder, the panel will automatically scan for available results. You can also manually trigger a scan by clicking the Scan Folder button [2] .
Available Results
After scanning, the panel displays all detected results organized by type. Each result type can be expanded or collapsed by clicking on it.
Quick Autotrack Results
[3]Shows results from Quick (ORB-SLAM based) tracking. These are found in quick_track_result folders and contain the camera trajectory and sparse point cloud from the quick tracking algorithm.
Quick track results import a camera with keyframe animation and a sparse point cloud representing tracked features.
Heavy Autotrack Results
[4]Shows results from Heavy (COLMAP/GLOMAP based) tracking. These are found in heavy_track_result folders and contain the full photogrammetry reconstruction including camera poses and sparse point cloud.
Heavy results that also contain a dense point cloud (generated with the High Quality Dense option) will show a point cloud icon indicator. When such results are selected, you can enable the Import Dense Point Cloud option to import the dense reconstruction as well.
Heavy track results use the Smart Importer to create accurate camera animation by extracting exact frame numbers from the individual camera data.
Mesh Generation Results
[5]Shows mesh reconstruction results. Meshes are generated inside the heavy_track_result/Undistorted folder and include both refined and textured mesh files.
The panel will detect mesh results from any heavy track result folder that contains mesh files like scene_dense_mesh_refine.ply or scene_dense_mesh_refine_texture.ply .
Tip: If you've run tracking multiple times, you'll see indexed versions like heavy_track_result_2 , heavy_track_result_3 , etc. This allows you to compare different tracking attempts or keep multiple versions.
Selecting Results to Import
Click on a result type header to expand it and see all available versions. Use the checkboxes next to each result version to select which ones you want to import. You can select multiple results across different types to import them all at once.
Import Settings
The Settings section [6] provides options to customize how results are imported.
Smart Importer
RecommendedWhen enabled, the Smart Importer creates accurate camera animation by extracting exact frame numbers from the COLMAP camera names. This prevents camera "sliding" that can occur when frame numbers don't match exactly. The Smart Importer also properly handles gaps in the tracked frames.
Import Undistorted
When enabled, imports the undistorted version of the reconstruction if available. Undistorted results have had lens distortion removed, which can be useful for compositing work where you want to work with rectilinear images.
Import Dense Point Cloud
This option appears when you have Heavy Autotrack results selected that contain a dense point cloud. Enable it to import the high-quality dense reconstruction alongside the camera and sparse points. The dense point cloud is found at Undistorted/scene_dense.ply inside the heavy track result folder.
Importing Selected Results
Once you've selected the results you want and configured the import settings, click the Import Selected button [7] to import everything into your Blender scene. The button will only be enabled when at least one result is selected.
Note: Importing results will add new objects to your scene. If you've already imported these results before, you may end up with duplicate cameras and point clouds. Consider using the Reset Cleanup panel to remove previous imports before re-importing.
Result Folder Structure
For reference, here's the folder structure that MotionMaster 3D creates for tracking results:
sequence_folder/
  ├── (your images)
  ├── heavy_track_result/
  │   ├── database.db
  │   ├── 0/
  │   └── Undistorted/
  │       ├── sparse/
  │       ├── scene_dense.ply
  │       └── scene_dense_mesh_refine.ply
  ├── heavy_track_result_2/      # Second run
  ├── quick_track_result/
  │   ├── log_forward/
  │   └── log_backward/
  └── quick_track_result_2/      # Second run
After importing your tracking results, you can use the Aligner panel to orient and scale your tracked solution, or the Point Cloud Cleanup panel to remove outlier points from your point cloud.

Click to enlarge
Select Footage Panel
The Select Footage panel is the first panel you will encounter in MotionMaster 3D when starting a new project. Here you decide which footage you want to work with. If you ever need quick help while working, remember that you can hover your mouse over any setting in Blender to see a small popup description.
If you ever need quick help while working, remember that you can hover your mouse over any setting in Blender to see a small popup description.
Image Sequence Selection
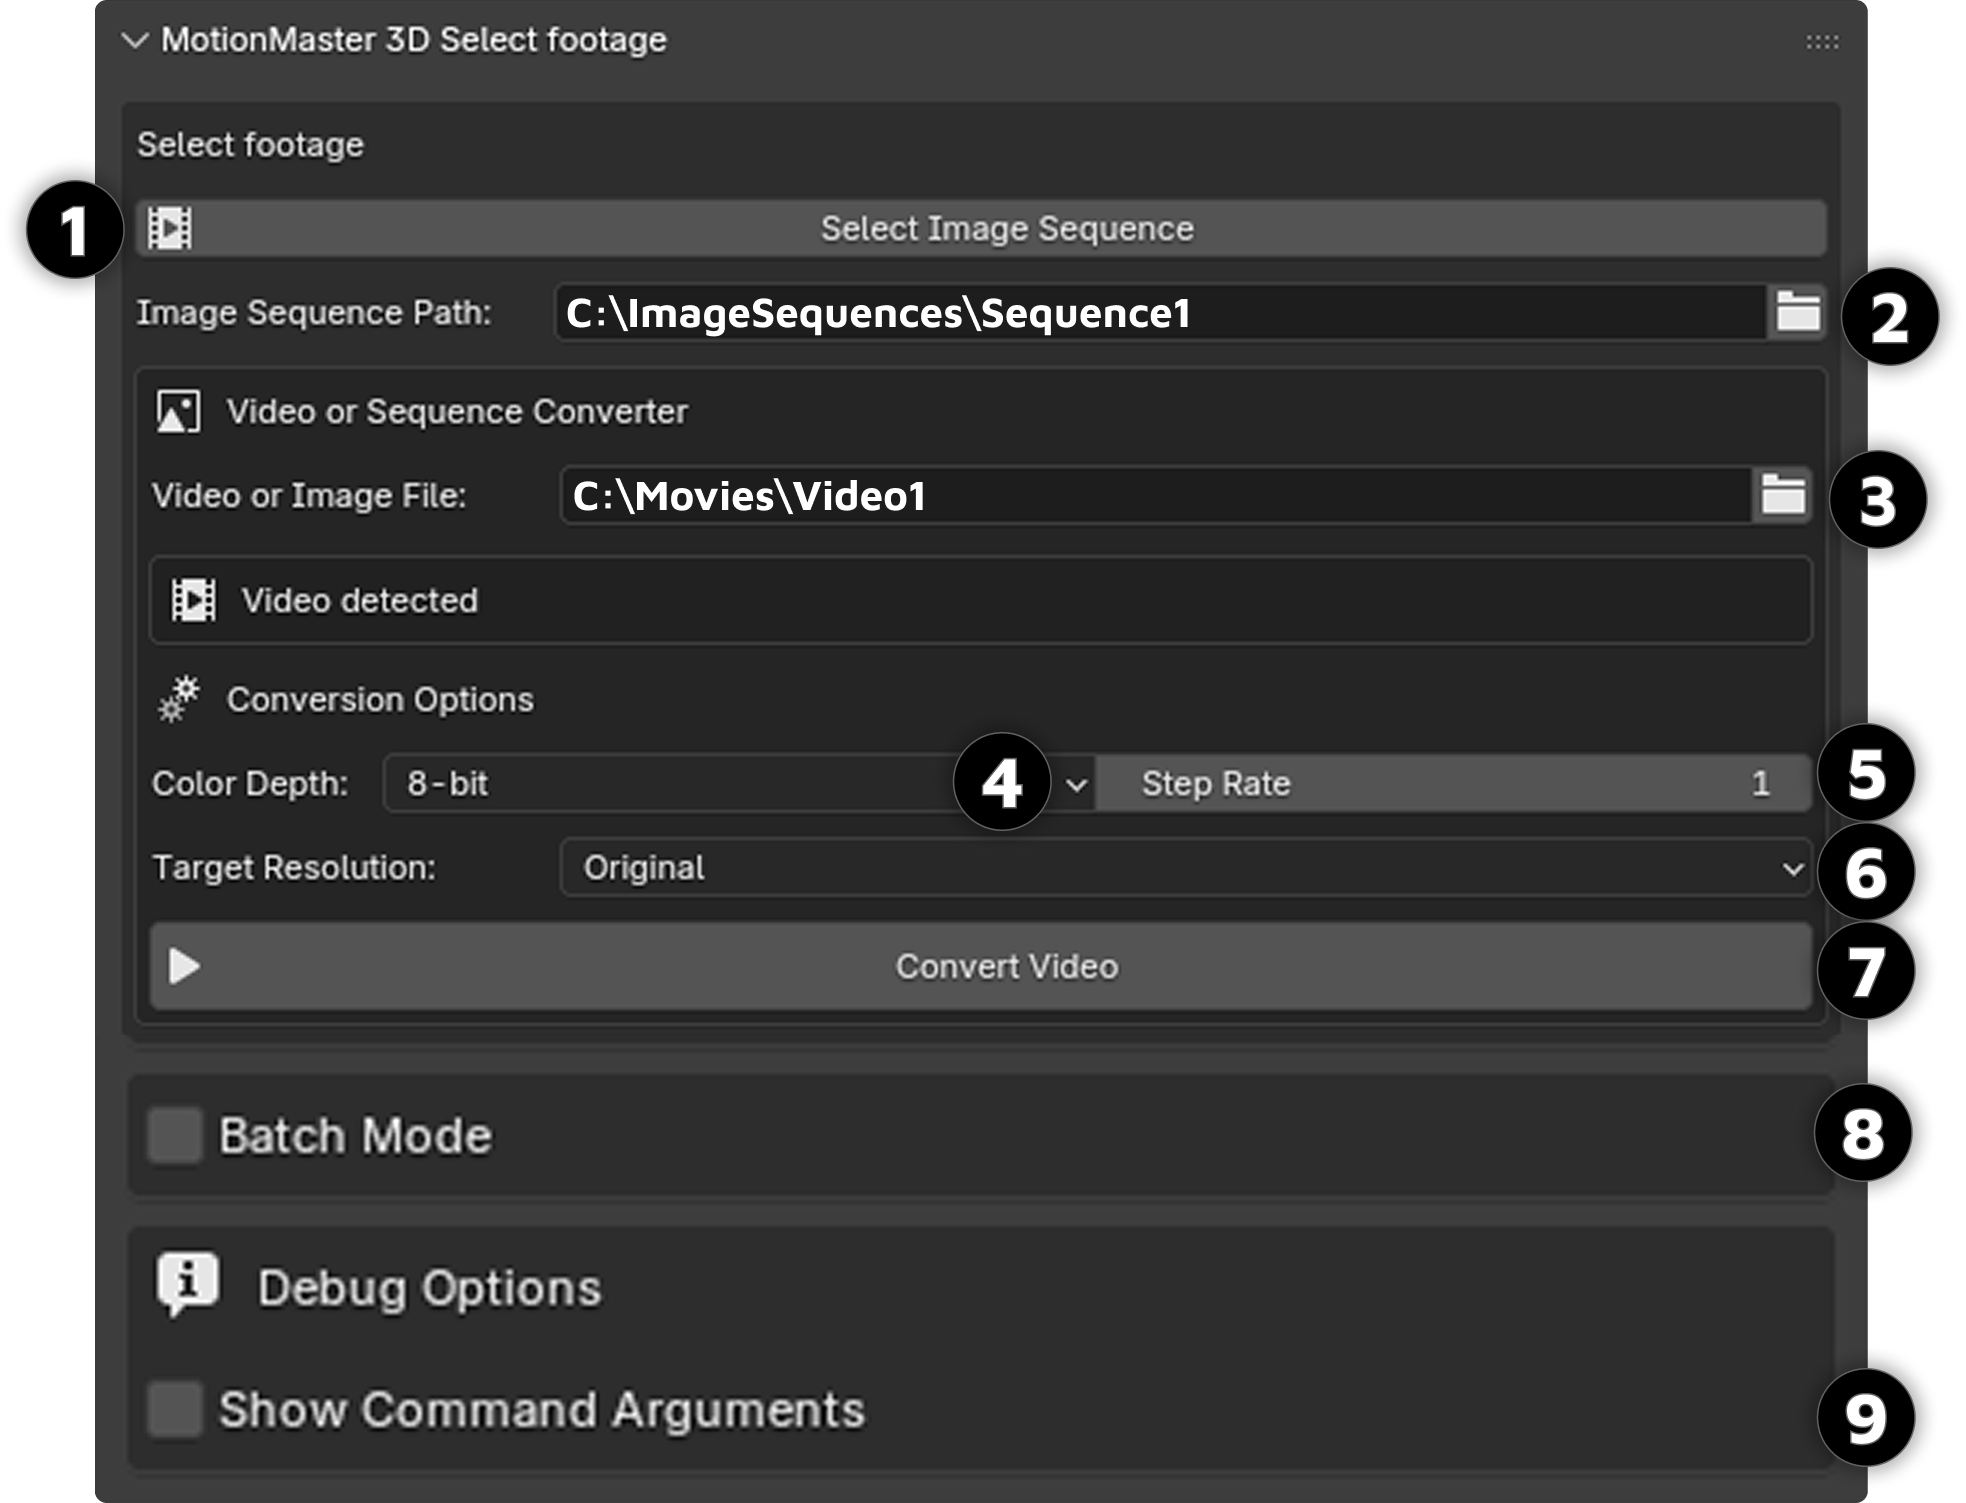
The first option [1] is Select Image Sequences. This lets you point the addon to the folder containing your image sequence. For example, if you select C:\ImageSequences\Sequence1 , the addon will scan the folder, collect all images, and sort them by name.
To avoid problems, make sure your images are named in a clear order such as image1, image2, image3, and so on.
You can either type in the path directly or use the folder icon [2] to browse for it.
Video or Sequence Converter
The Video or Sequence Converter is where you prepare your media. It can either transform a video into an image sequence or adjust an existing image sequence to a new resolution, color depth, or step rate.
When you select a file or folder [3] , the addon automatically detects what you picked. If you select a video, the text "Video detected" will appear, while choosing a folder of images will show "Image sequence detected: [Number] frames".
From here you can adjust a few important settings:
- • Color depth [4] allows conversion to 8-bit or 10-bit images.
- • Step rate [5] determines how many frames are skipped. For example, a video with 100 frames and a step rate of 5 will result in 20 images. A higher step rate is useful when you only need a mesh, while a step rate of 1 is recommended for accurate camera tracking.
- • Target resolution [6] lets you downscale the footage for faster processing or keep the original resolution if you prefer maximum quality.
Once the settings are chosen, click Convert Video or Convert Image Sequence [7] . A new folder called Sequence will appear alongside your media, containing the processed images.
Batch Mode
The next option is if you want to use the "Batch Mode" [8] , and when you enable it, you will enable the "Batch Processing" panel, which we will talk about shortly. This is used if you want to process multiple footages at once and do multiple operations at once.
Show Command Arguments
Lastly is the "Show Command Arguments" [9] , which is used to print out the command arguments used for the current running operator, which can be seen in the terminal (this is mostly for development or debugging/support).
Click to enlarge
Batch Processing Panel
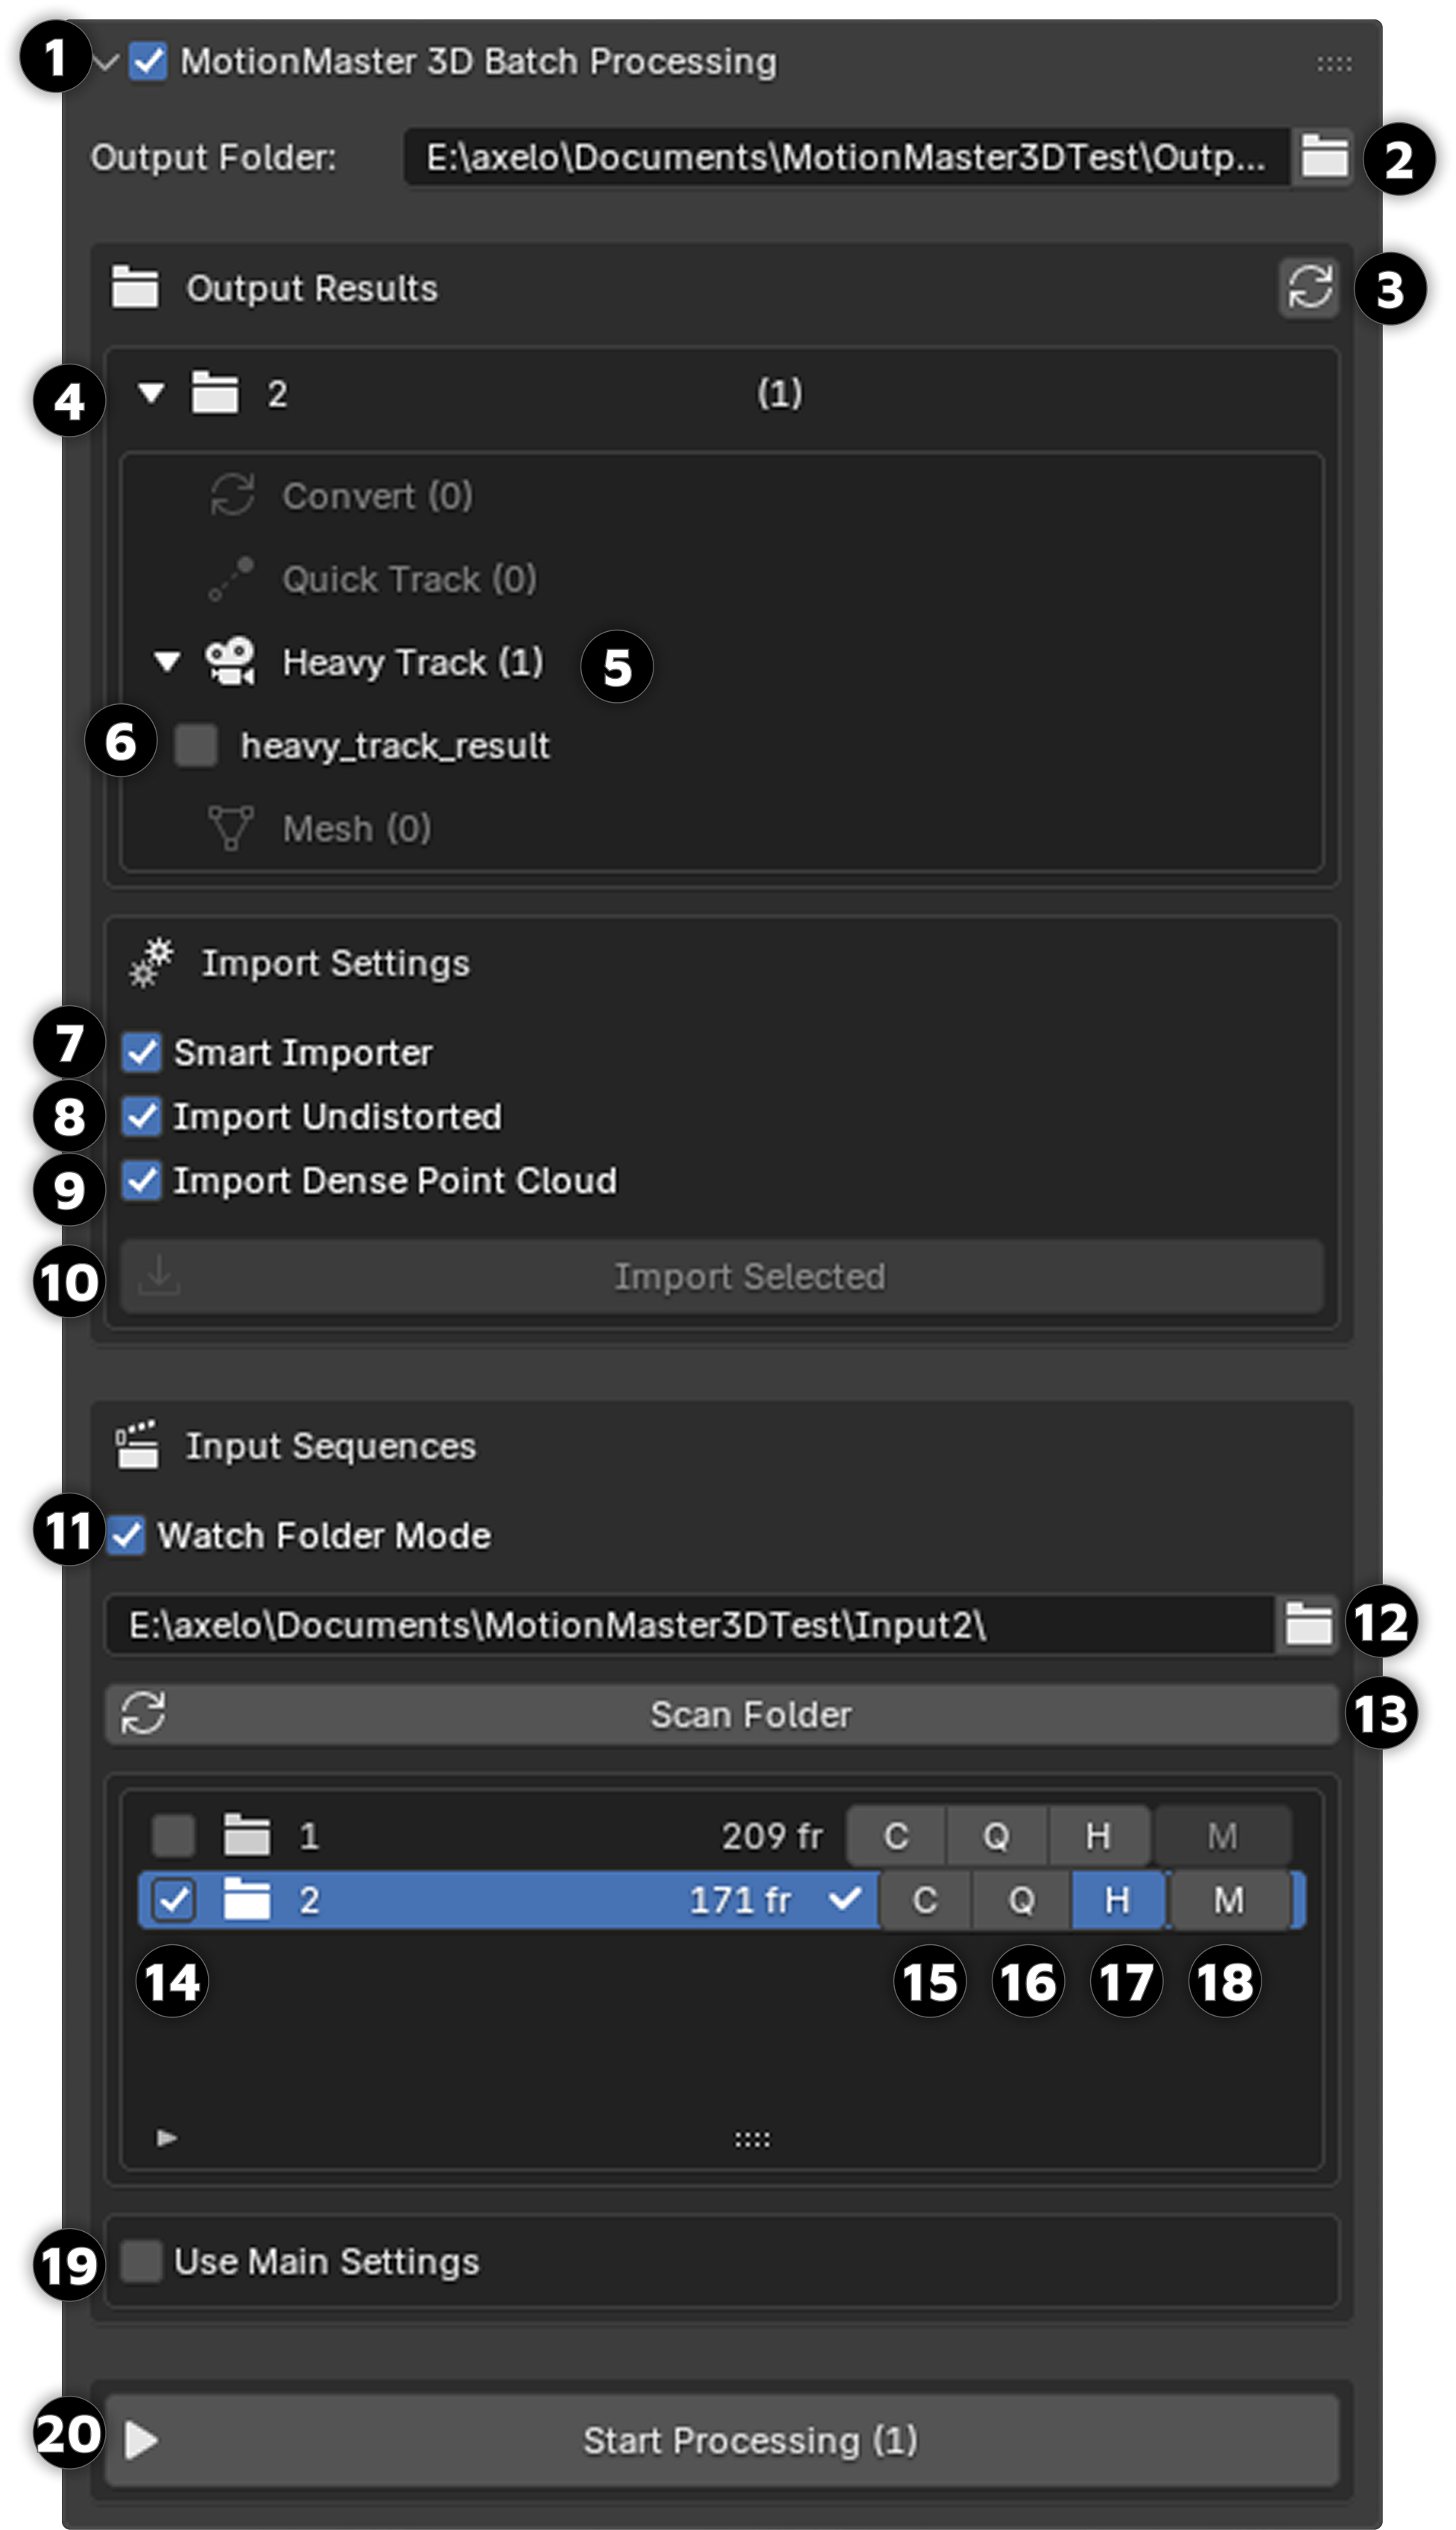
This is one of the more powerful features of MotionMaster 3D because it allows you to process multiple sequences at once, where each footage has its own set of operators applied to it. The Batch Processing panel is divided into two main sections: the Output section (top) where results are stored and imported, and the Input section (bottom) where you select footage and choose operations. While the Output section appears first in the UI, you will typically set up your inputs and process them before having any results to view.
Output Section
First is the toggle button [1] , and this is exactly the same as the "Batch Mode" button in the "Select Footage" panel. It simply decides if you want to use batch mode or process one sequence at a time. Next is the "Output Folder" [2] , where you specify where the results will be stored after they are done. Each sequence gets its own folder, and each operator gets its own subfolder inside the sequence's folder.
The "Scan Result" button [3] is used to reread the current output folder for any new results. For example, after you have processed some input sequences, you can press this button and it will reread the contents of that folder. The results then show up neatly in the Output Results view window [4] .
In the output results view, you can see all your processed sequences. Each result from an operator is listed (for example, "heavy_track_result" [5] ). To import the result, you select the result you want to import [6] and then decide which parts to import. If you remember from the panel overview, the Heavy panel includes a heavy autotracker and also a dense point cloud generator, which needs undistorted footage. In nearly all situations, you want to have "Smart Importer" [7] enabled, and depending on whether you also chose to undistort and create a dense point cloud, you should check [8] and [9] as well. When you have chosen which parts you want to import, press "Import Selected" [10] and it will import your selected parts from the result folder.
Input Section
Now that we have covered how to use the output part of the batch processor, let's look at how to get results in the first place. You need to first choose different input sequences and then process them.
To choose your input footages, you can either import each image sequence separately or enable "Watch Folder Mode" [11] , which allows you to specify a folder that contains subfolders with image sequences. To do that, specify the watch folder path [12] , scan that folder [13] , and the sequences will appear in the input window.
In the window, you can toggle on and off which folders you want to use [14] , and you can also specify exactly which operations you want to perform for a specific image sequence:
- • [15] converts the image sequence/video with the current settings you have chosen in the "Select Footage" panel.
- • [16] performs a quick track on the image sequence using the settings from the "Quick" panel.
- • [17] performs the heavy operator using the settings in the "Heavy" panel. For example, if you have specific settings for how the heavy autotrack should be performed and have enabled undistorting the image sequence and dense point cloud generation, it will do all of that.
- • [18] is the mesh generation option, which allows you to decide if you want the batch processor to perform mesh generation for the currently selected footage with the settings from the Heavy panel.
Main Settings and Processing
The "Use Main Settings" option [19] , when enabled, allows you to specify a general set of operations you want to perform on all the image sequences instead of deciding which operators to apply one by one. When this setting is enabled, you will also get the option to enable autorun. When you then start processing, it will automatically perform the general main operations on all new sequences added to the watch folder. This is currently a new feature and is under development.
The "Start Processing" button [20] begins performing the specified operations on the specified input image sequences, processing them one by one. If you have a license type that allows email notifications and you have turned on this feature in the "Account" panel, you will receive a notification on your email when the processing is done.
The Batch Processing panel is a powerful tool for automating your workflow. Set it up once, and let it process multiple sequences while you focus on other tasks.
Click to enlarge
Quick Panel
The Quick Autotrack feature in MotionMaster 3D provides a fast way to track your footage using SLAM (Simultaneous Localization and Mapping). When using this method, you get a live preview of the camera solve combined with your footage, showing how features are extracted and how the camera's movement is calculated.
Keep in mind that this method requires knowledge of your camera intrinsics, such as sensor width, focal length, and resolution in both X and Y, in order to accurately solve the camera. It is also helpful if you know the distortion parameters of your lens, but this is not strictly required unless your footage has significant distortion.
Alpha Feature: This feature is currently in an experimental Alpha state. In most cases, we recommend using the more versatile Heavy Autotrack alternative, also included in the MotionMaster 3D toolkit.
With that said, let us go through the Quick panel in detail and explain what each parameter does.
Saved Optics Presets
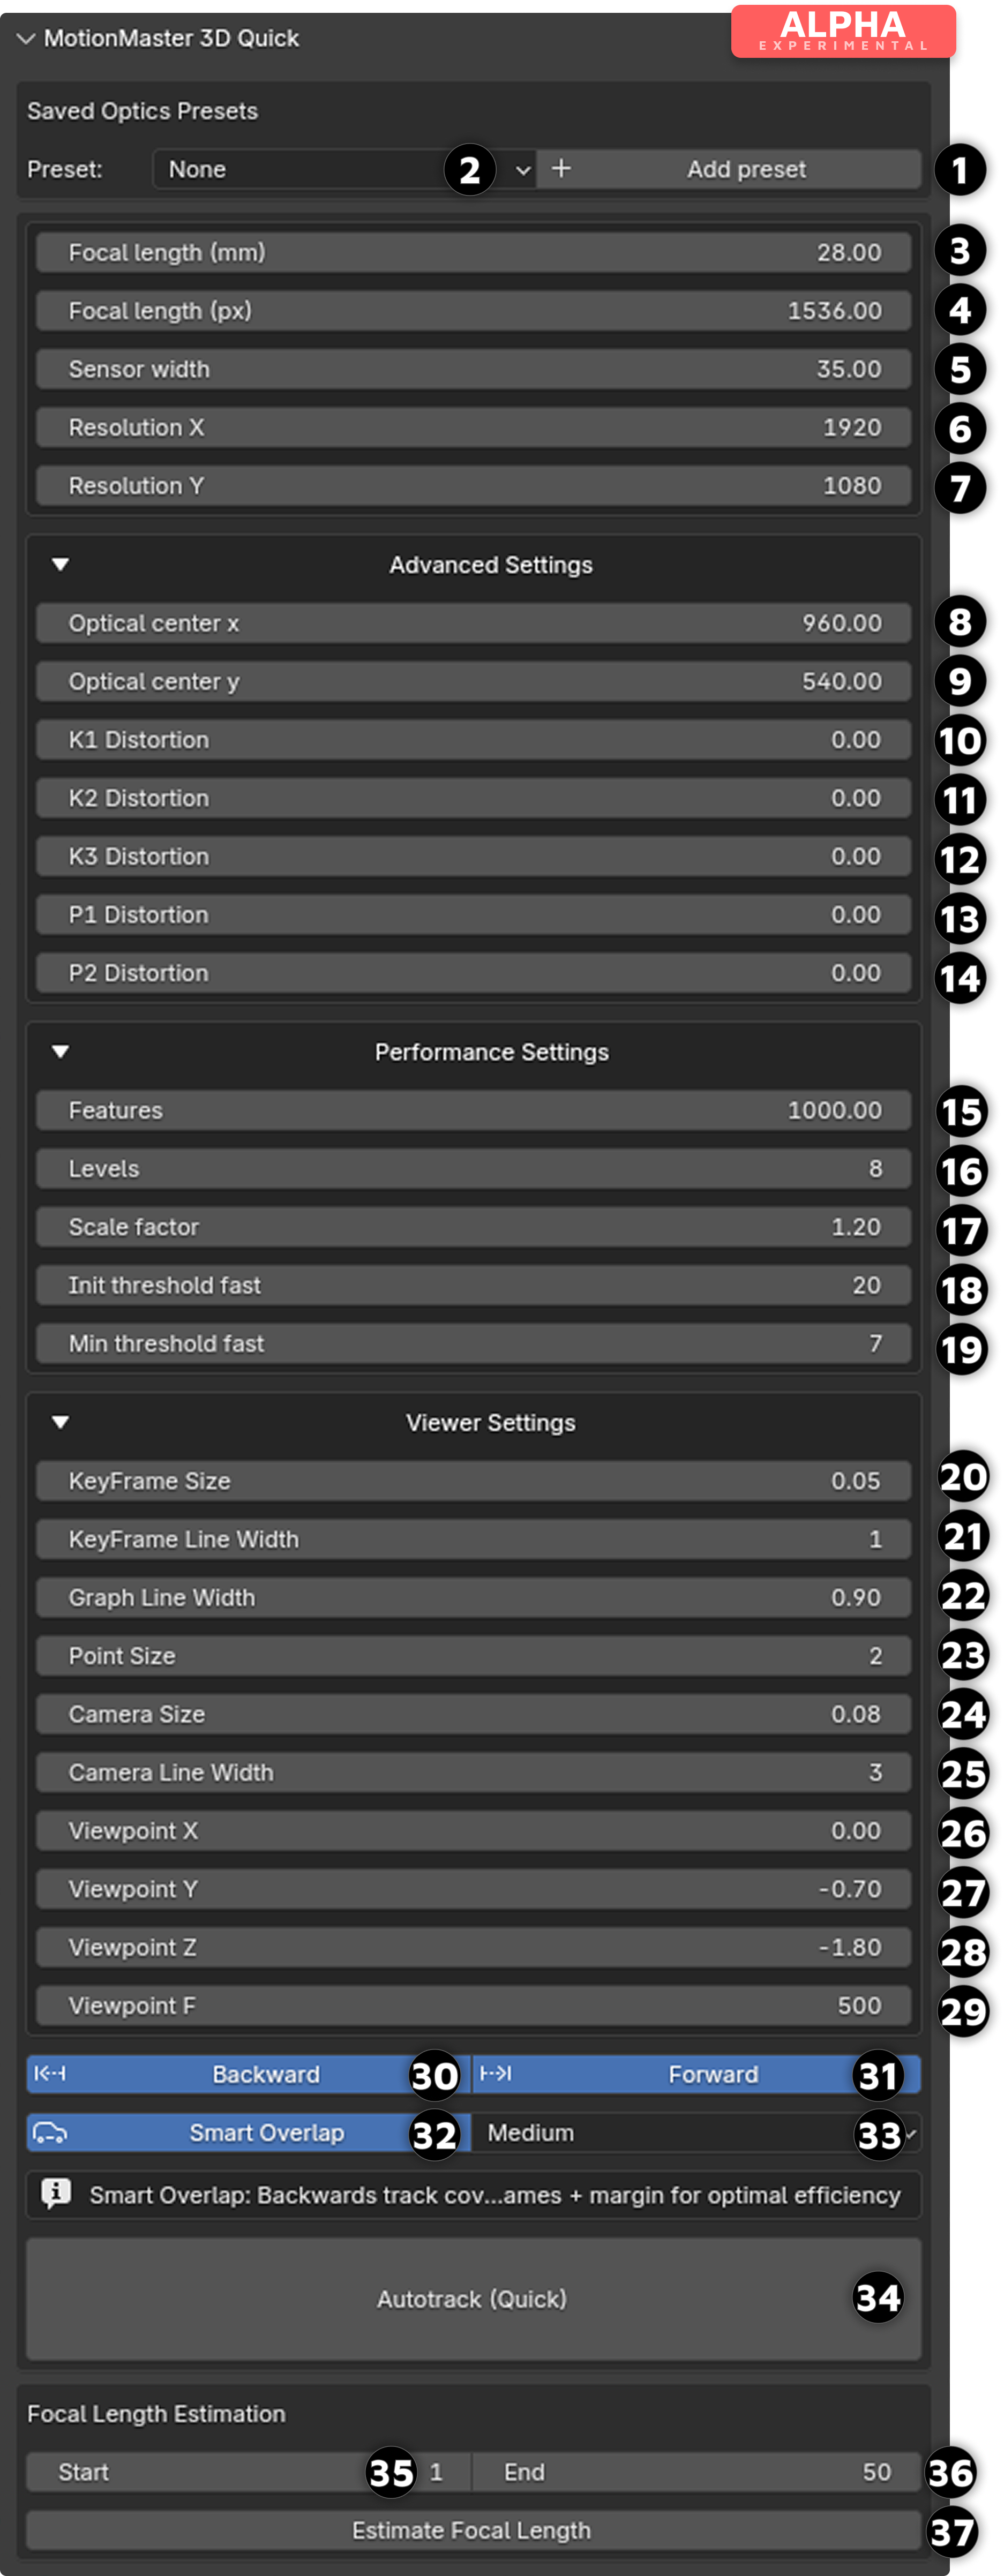
The first section is the Saved Optics Presets tab. Here you can save your current configuration as a preset for later use by clicking Add preset [1] . To apply an existing preset, open the dropdown menu and select the one you want [2] .
Optics Configuration
The main configuration box is where you define the core intrinsics. You can enter the Focal length (mm) [3] or the Focal length (px) [4] , as well as adjust the Sensor width [5] and the footage resolution in X [6] and Y [7] .
These values are linked: for example, if you change the sensor width or resolution, the focal length in pixels will automatically update because these parameters are constrained by a formula. Correct optics settings are crucial for a successful track. Most problems that arise are due to incorrect intrinsics, so make sure these values are accurate. If you notice that almost no features are being extracted, it is likely because the optics settings are incorrect, which results in the wrong focal length in pixels.
Advanced Settings
The advanced settings include the optical centers in X [8] and Y [9] . By default, these are set to half of the resolution values [6][7] , and they update automatically when the resolution changes. This is intentional, since most users do not need to adjust them manually. However, if you do want to set custom values, first define the resolution, then overwrite the optical centers.
The rest of the fields are for lens distortion values: K1 [10] , K2 [11] , K3 [12] , P1 [13] , and P2 [14] . In most cases, you can leave these at their defaults unless you know your camera's calibration.
Performance Settings
Performance settings affect how the tracker extracts and matches features. The Number of features [15] controls how many features to look for in each frame (default 1000). Levels [16] defines how many pyramid levels are used. A pyramid is a set of downscaled copies of each frame, which allows the tracker to find features at different scales (zoomed in or out).
Each level is scaled according to the Scale factor [17] . For example, with a scale factor of 1.20, level 0 is the original image, level 1 is scaled to 1/1.2 of the original size, level 2 to 1/(1.2²), and so on. A smaller scale factor gives finer steps between levels but requires more levels to cover large zoom differences, while a larger scale factor is faster but less precise.
The Init threshold fast [18] sets the primary threshold for the FAST corner detector. It looks for strong, obvious features first. If not enough are found, the tracker falls back to the Min threshold fast [19] , which accepts weaker features. If you are not getting enough features, try increasing the feature count [15] and lowering the threshold values [18][19] .
Viewer Settings
The Viewer settings control how the live preview window looks. While most users will not need to change these, they can be useful for customizing the display.
You can adjust the keyframe size [20] and keyframe line width [21] to change how keyframes appear, and the graph line width [22] to control the thickness of the motion path. The point size [23] changes how large feature points are displayed. The camera size [24] and camera line width [25] affect how the drawn camera rig looks. Finally, the viewpoint parameters [26–29] set the default viewer position and focal length, which define the angle and distance from which the tracking scene is shown.
Tracking Direction and Overlap
At the bottom of the panel are the Forward [31] and Backward [30] options, which control the tracking direction. Quick Autotrack is a SLAM-based tracker, meaning it only has access to past frames, not future ones. This allows real-time tracking but also requires an initialization period before it can begin solving the camera. As a result, the first few frames will not have a solved camera position.
For example, in a 100-frame sequence, the tracker might only start solving at frame 20, leaving frames 1–19 without a solution. To minimize this gap, try to include parallax movement (camera translation) early in the footage, as this helps the tracker initialize faster.
To fill in missing keyframes, you can enable Backward tracking [30] . After the forward pass, it runs a backward pass that covers the frames the forward track missed.
The Smart overlap [32] feature improves this process by limiting the backward pass to only the region where the forward tracker failed, plus a margin. The margin is controlled by the Overlap setting [33] : Low (factor 2), Medium (factor 3), or High (factor 4).
For example, if the forward pass starts solving at frame 20, the initialization period is 19 frames. With Smart overlap set to Medium, the backward pass will start at approximately frame 77 (20 + 19 × 3) and track backwards to fill the gap. In most cases, you can leave these settings at their defaults.
Running Autotrack
Once everything is configured, press Autotrack (Quick) [34] to begin. Two windows will appear: one showing the live camera solve and one showing the feature extraction. If both Forward and Backward tracking are enabled, these windows will reopen for the second pass. When the process finishes, you will see the extracted 3D points and a moving camera in your Blender scene.
Focal Length Estimation
The Quick panel also includes a Focal length estimation tool. Set a start frame [35] and an end frame [36] , then press Estimate focal length [37] . The addon will run a short process using the Heavy Autotracker in the background to estimate the focal length from that section of footage.
The resulting value is relative to your current sensor width and can provide a useful starting point. However, note that this feature is still in Alpha and may not always yield the best result.
Click to enlarge
Heavy Panel
The Heavy panel is the primary processing panel in MotionMaster 3D. It combines COLMAP, a custom-compiled GLOMAP, and OpenMVS to deliver robust and high-quality results. In this panel, you can configure all major operations: feature extraction, matching, mapping, and mesh generation. The Heavy tracker is reliable and stable, offering a balance between processing time and accuracy. By adjusting the available settings, you can fine-tune performance and result quality to suit your project.
This panel includes two modes: Simple mode and Custom mode. As you can tell from the names, one is intended to be much simpler than the other, which allows you to make custom changes and apply the exact settings you want. We will first go through how to use Custom mode and then Simple mode.
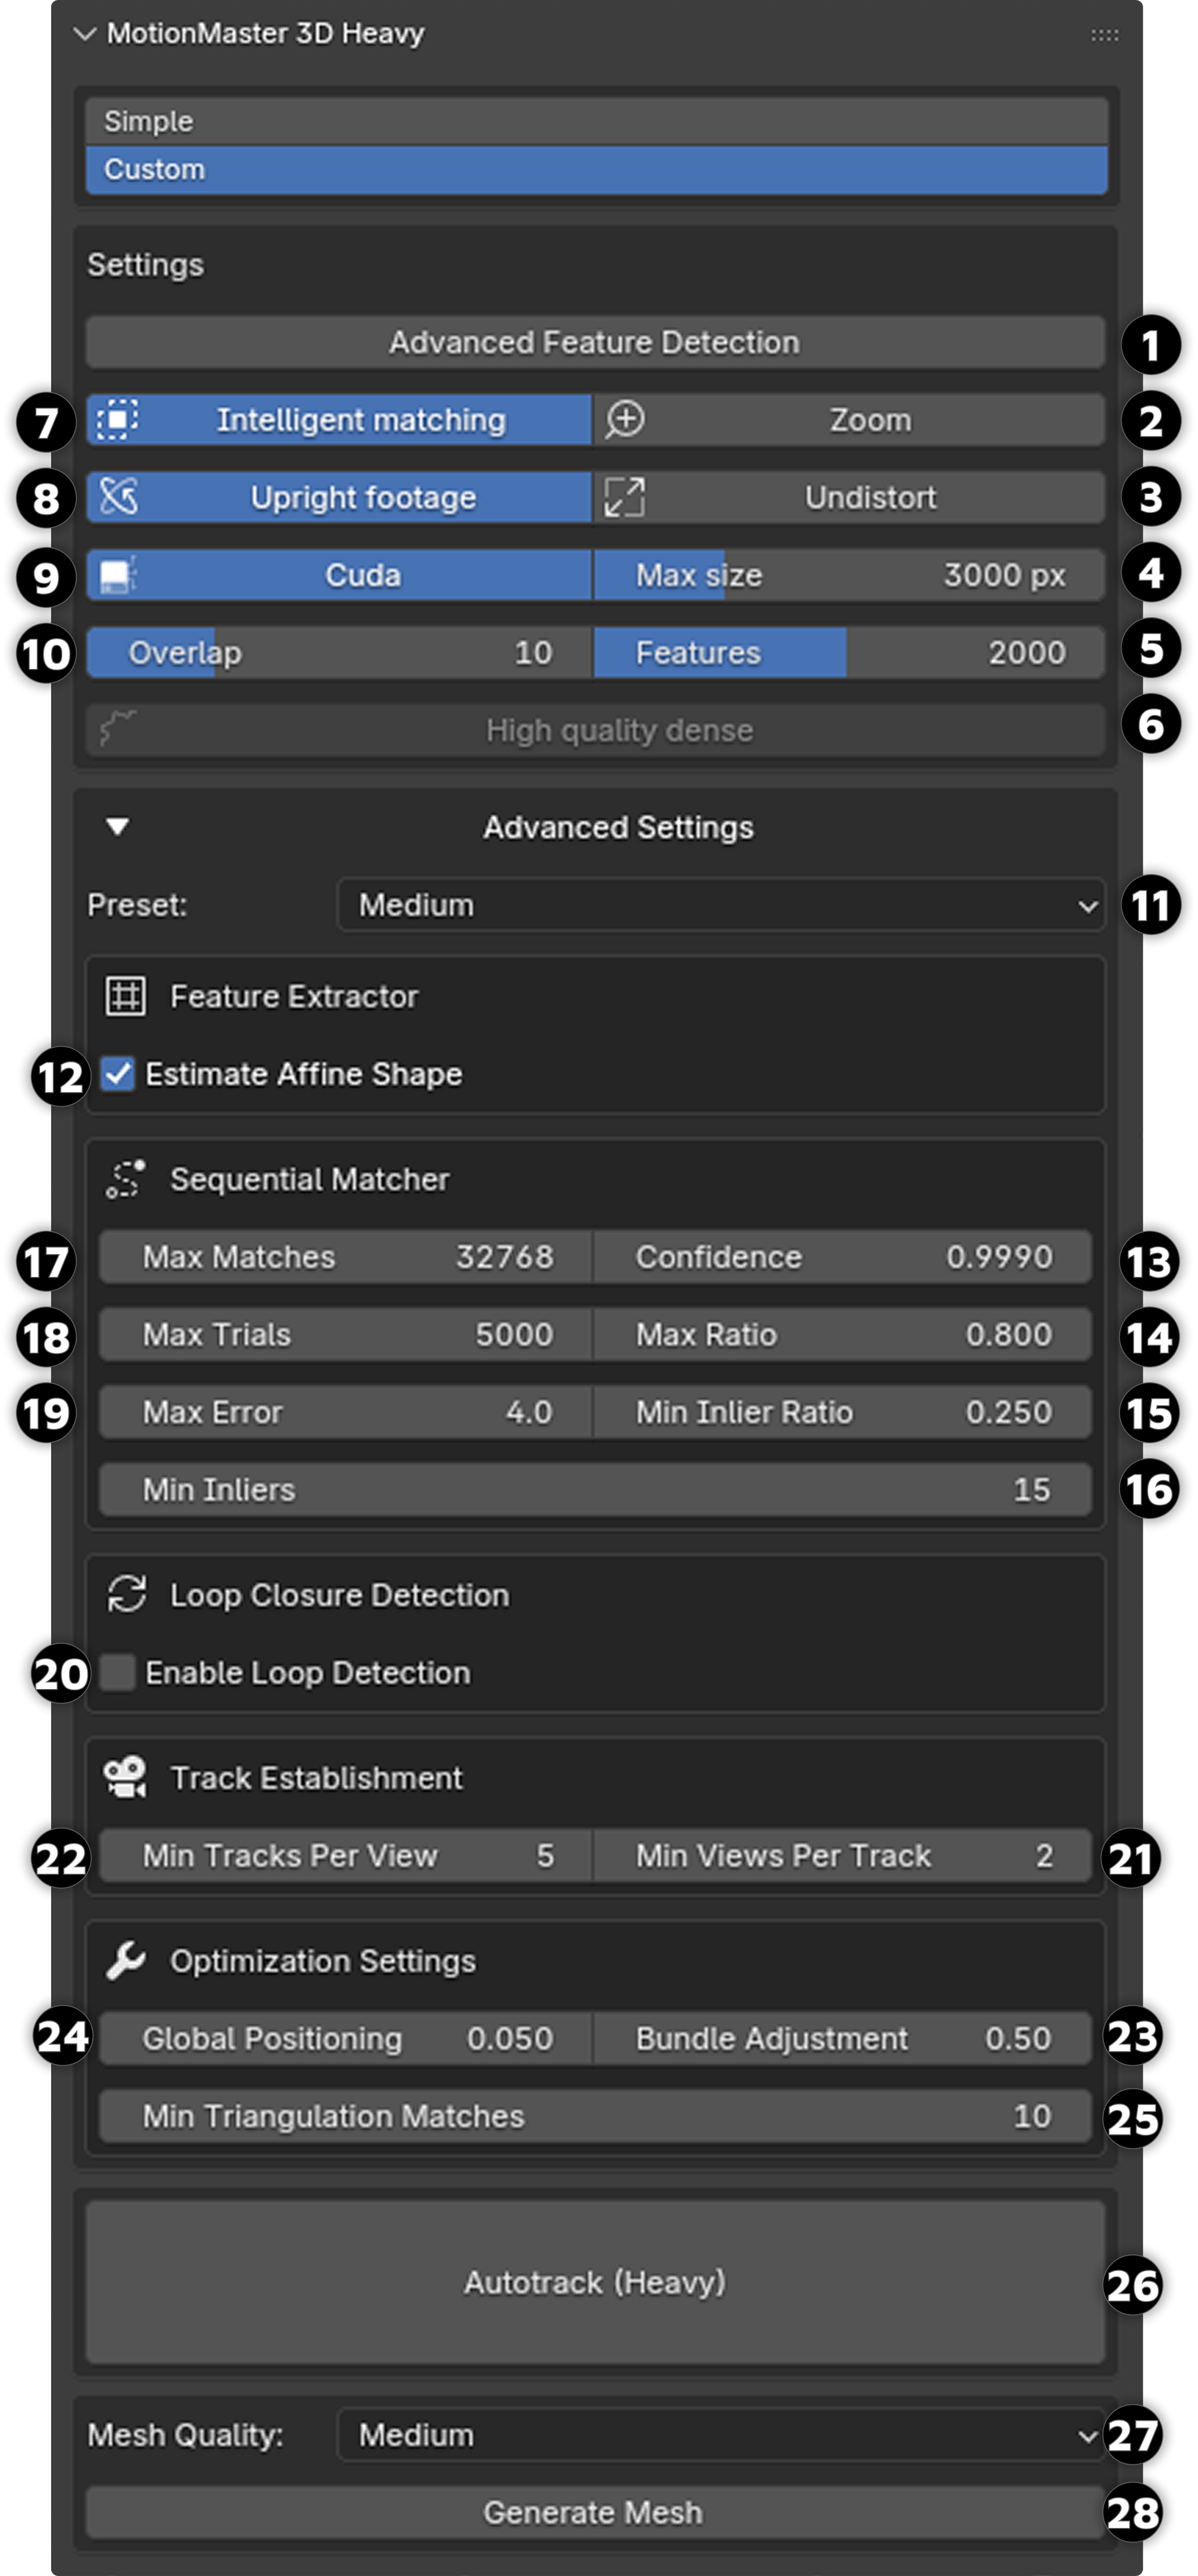
Note on Reference Numbers: In this section, some settings appear in both Custom mode and Simple mode. To distinguish between them, reference numbers are prefixed with "C" for Custom mode and "S" for Simple mode (for example, C[3] refers to setting [3] in Custom mode, while S[5] refers to setting [5] in Simple mode).
Main Settings (Custom Mode)
The first section is the Settings box, which defines the key operations and processing options.
- • Advanced Feature Detection [1] enables domain size pooling during feature extraction. This makes the system more robust on difficult footage with motion blur or large perspective changes. Note that enabling this forces the extraction step to run on the CPU, even if CUDA [9] is enabled.
- • Zoom [2] allows focal length to vary across frames. Use this if your footage contains zooming, as the solver will no longer assume a constant focal length.
- • Undistort [3] processes each image to remove lens distortion and saves undistorted versions in a subfolder.
- • Max Size [4] sets a limit on image resolution. For example, if your footage is 6000 × 4000 pixels, and you set Max Size to 3000, the images will be downscaled to 3000 × 2000.
- • Features [5] controls the maximum number of features extracted per image. More features increase detail and accuracy but also processing time.
- • High Quality Dense [6] is available only when Undistort [3] is enabled. It generates a dense, colorized point cloud from your footage, allowing highly detailed 3D scene reconstruction.
- • Intelligent Matching [7] uses a smarter strategy for feature matching between images, improving efficiency and robustness.
- • Upright Footage [8] assumes the footage has no roll rotation, greatly speeding up feature extraction.
- • CUDA [9] enables GPU acceleration for supported operations.
- • Overlap [10] sets how many neighboring images are compared during matching. Lower values are faster but less accurate, while higher values improve reconstruction quality at the cost of speed.
Advanced Settings
The Advanced settings allow further control over tracking and reconstruction. For most cases, simply select the Medium preset [11] , which balances speed and quality.
- • Fast preset reduces processing time significantly but may lower tracking accuracy.
- • Heavy preset is slower but produces higher quality than Medium.
- • Extreme preset switches to exhaustive matching and additional refinements, producing the highest quality results but with very long processing times.
All presets adjust the values in the advanced settings, but you can also override them manually:
- • Feature Extractor [12] improves extraction on footage with strong perspective changes.
- • Confidence [13] sets the geometric verification threshold. Higher values are stricter, filtering out more bad matches but also potentially discarding good ones.
- • Max Ratio [14] controls how selective matching is. Lower values give fewer but more reliable matches; higher values keep more matches but risk false positives.
- • Min Inlier Ratio [15] defines the minimum ratio of inliers required for a match to be accepted.
- • Min Inliers [16] is the absolute minimum number of inliers needed between two images for them to be linked.
- • Max Matches [17] limits the number of matches per image pair to avoid memory overload and excessive processing time.
- • Max Trials [18] sets the maximum number of attempts to fit a geometric model. Higher values improve reliability but slow things down.
- • Max Error [19] sets the maximum pixel error allowed for a point match. Lower values enforce stricter accuracy; higher values are more forgiving but less precise.
Loop Closure
Enable Loop Detection [20] activates loop closure detection. This helps when the camera revisits the same area, such as walking in a circle or orbiting around an object, ensuring consistent alignment.
Track Establishment
These settings control how many observations are required for reliable tracks:
- • Min Views Per Track [21] is the minimum number of images that must observe a 3D point for it to be accepted. More views increase reliability but may discard useful points if set too high.
- • Min Tracks Per View [22] defines the minimum number of points required for an image to be included in the reconstruction.
Optimization
Optimization settings refine the final reconstruction:
- • Bundle Adjustment [23] sets how strongly the system refines camera poses and 3D points. Higher values improve accuracy but require more computation.
- • Global Positioning [24] controls how strictly global position constraints are enforced. Lower values allow flexibility, while higher values enforce tighter alignment.
- • Min Triangulation Matches [25] sets the minimum matches needed to triangulate a new 3D point. Lower values create more points but may add noise, while higher values give cleaner geometry but fewer points.
Running the Heavy Tracker
To start the Heavy Autotrack, press Autotrack (Heavy) [26] . Make sure the system console is open so you can follow progress in real time. To stop the process, click inside the console window and press Ctrl+C.
Now that you have a good understanding of the different settings in Custom mode, let's go through Simple mode:
Main Settings (Simple Mode)
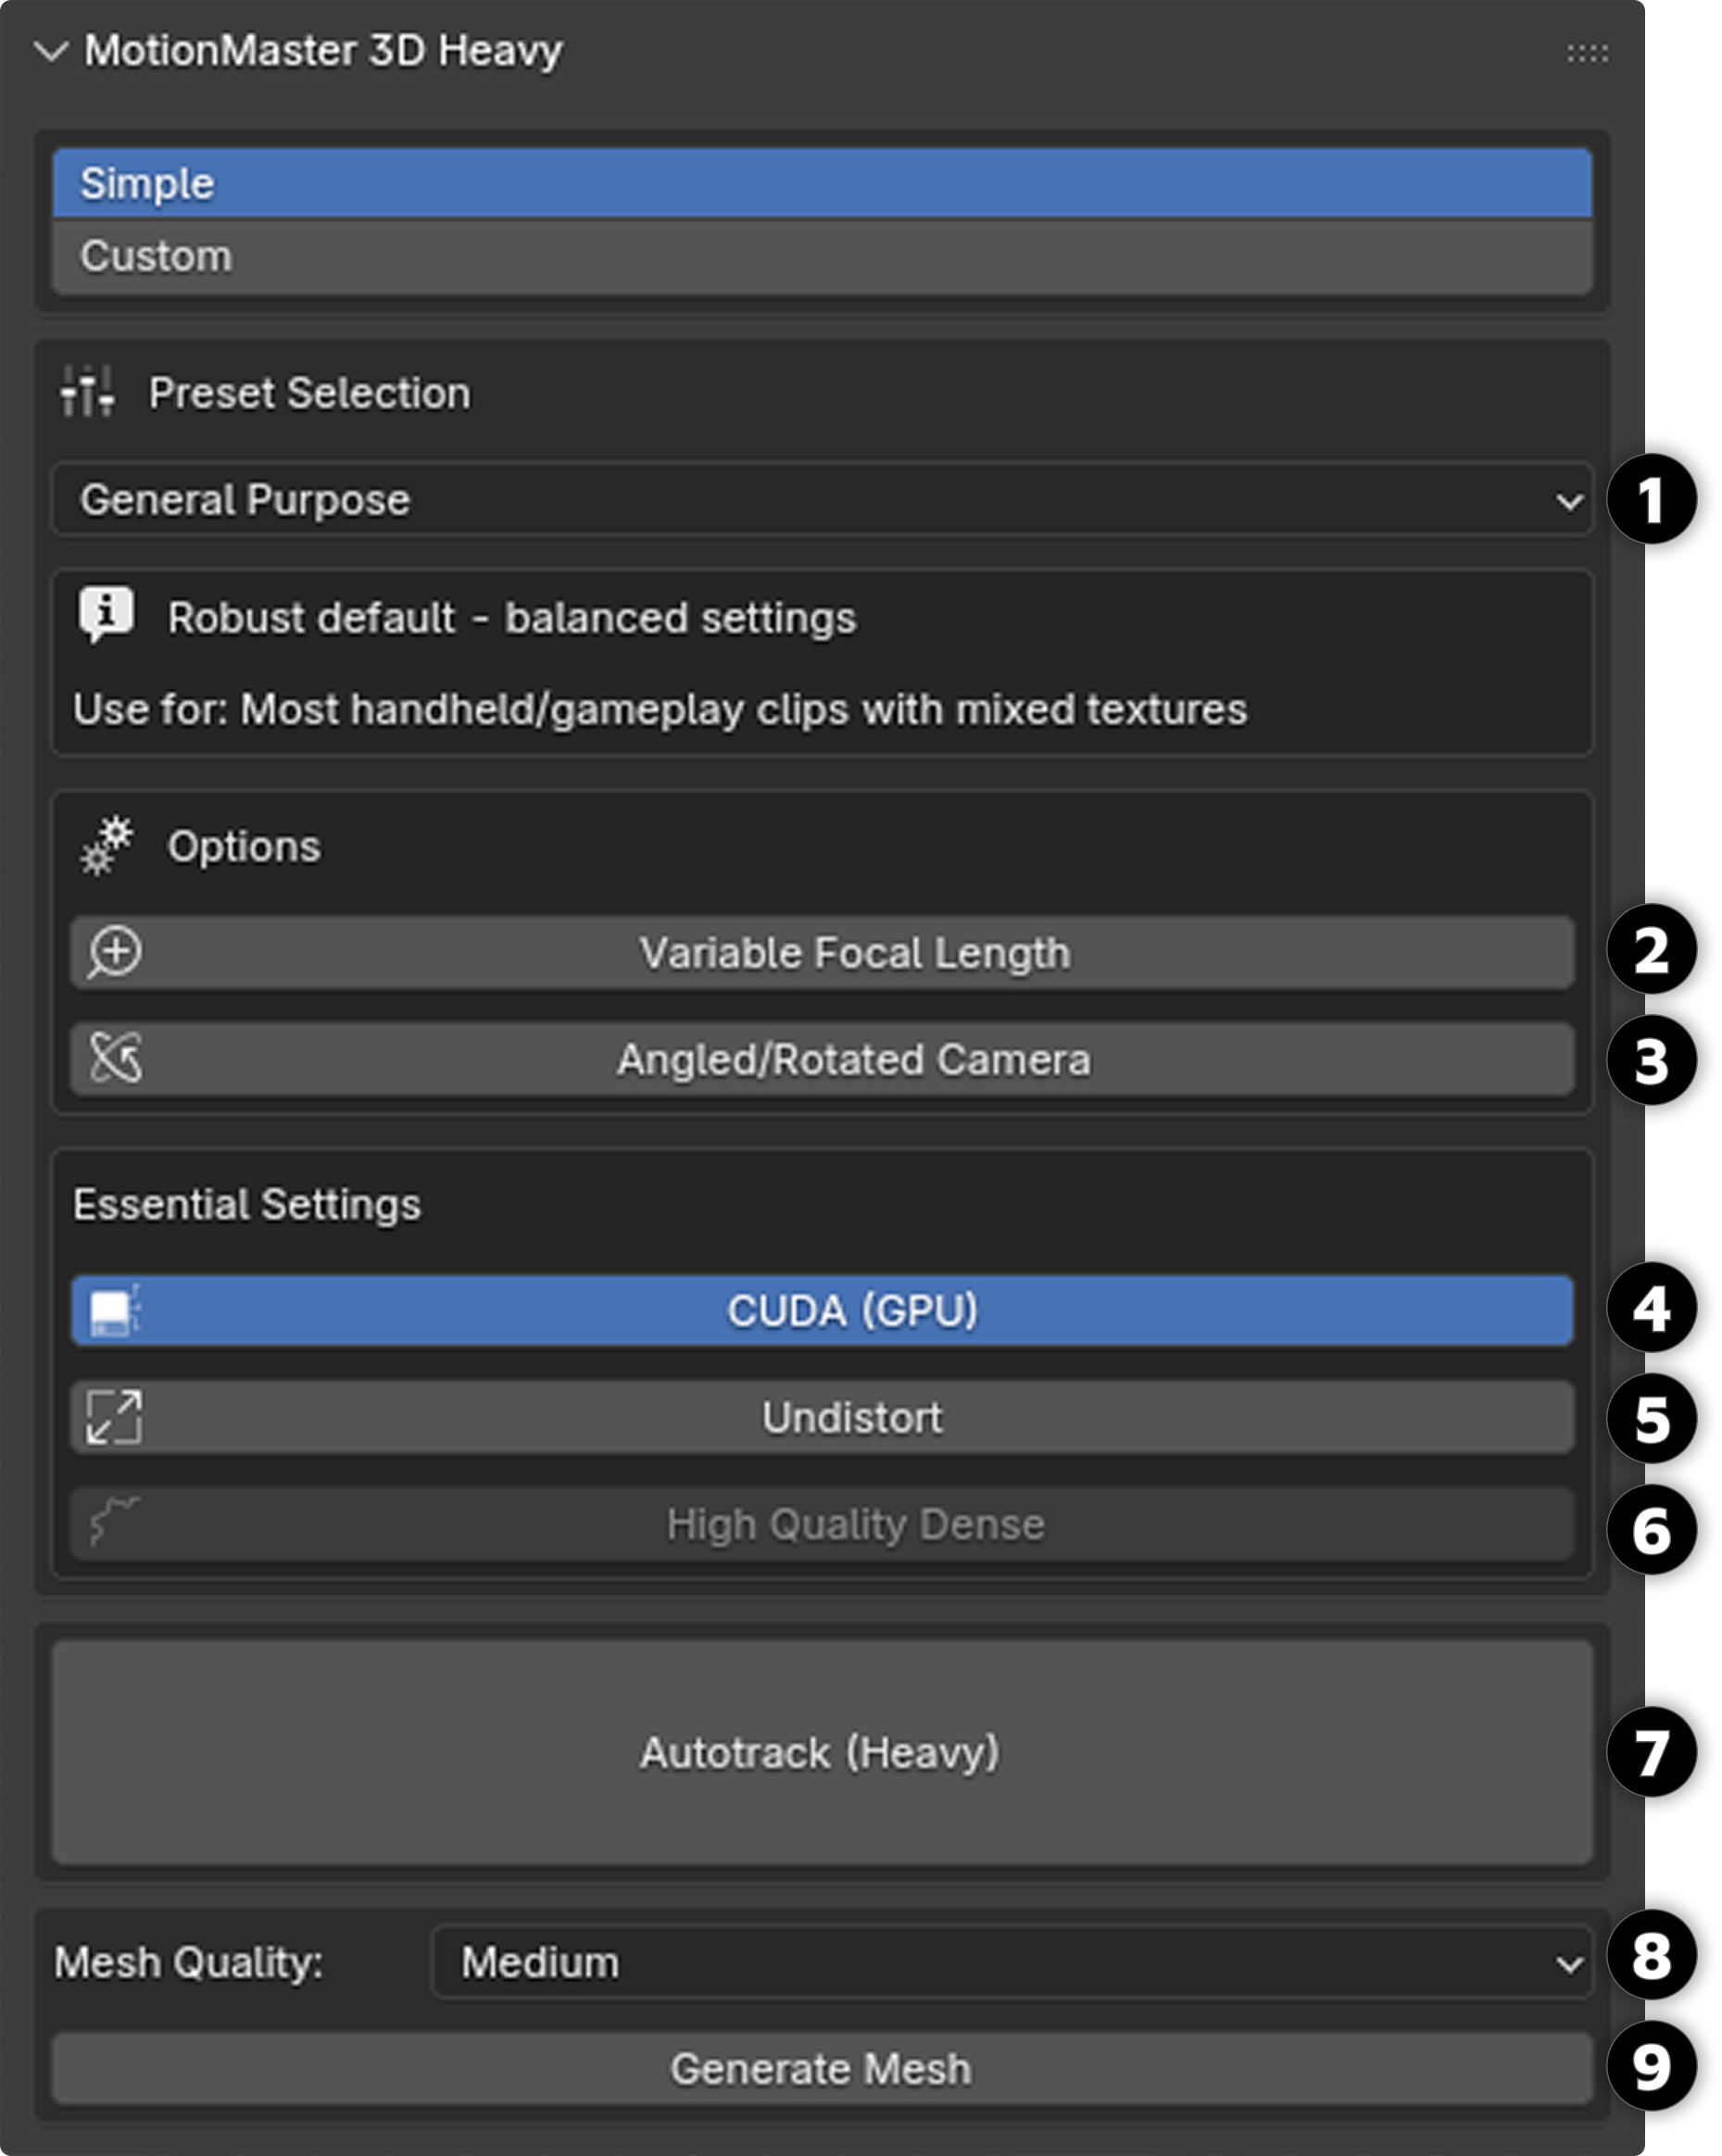
Now nearly all the different settings are gone, and left are some presets and a few options. Currently, the simple view offers 9 different premade presets [1] , which are each intended to be used in different scenarios. We will go through them one by one:
- • Fast preview: Use for a fast first pass to see if the clip reconstructs.
- • General Purpose: This is the default preset and is intended to be used in most scenarios such as handheld footage with mixed textures. This is a balance between speed and performance.
- • Repetitive textures: Good for scenes with repetitive textures such as grids, bricks, architecture, floors, and more.
- • Forward motion: Use when walking straight, car dash, head-mounted, and so on.
- • Orbit / Turntable: Use when rotating around an object, tripod pan, or turntable.
- • Extreme robust: Good for more challenging scenarios that require extreme reliability.
- • Moving subjects: Use for dynamic scenes with people or objects moving in frame.
- • Sparse features: Good for deserts, walls, uniform surfaces, and low-texture scenes.
- • Last Resort: Use when all other presets fail; this is a last attempt.
(If you notice that any specific configuration works great in any particular situation and you would like to share it with the community, feel free to contact me and I might add it as a preset available for everyone in the next update.)
Options
Here you have the option to turn on or off two features: Variable Focal Length [2] and Angled/Rotated Camera [3] . The first option should be enabled if your footage includes a zoom, meaning that your focal length changes throughout the sequence. The next option, Angled/Rotated Camera [3] , should be enabled if you rotate your camera a lot in the sequence you are trying to track.
Essential Settings
In this box, you have three settings to decide. The first one is CUDA (GPU) [4] , and when this is enabled, parts of the processing will happen on the GPU. Note that you need to have an NVIDIA GPU for this to work. Next is the Undistort [5] setting, and when this is enabled, it will undistort your footage and try to find the distortion intrinsics of your footage. Lastly is the High Quality Dense [6] setting, which requires the Undistort [5] option to be enabled for it to work (therefore it is greyed out in the right image). When the High Quality Dense [6] setting is enabled, it also makes the heavy tracker produce a dense point cloud of the scene. Each point in the point cloud will receive its own color from the footage, making it accurately replicate the captured scene. Note that the High Quality Dense [6] feature needs to be enabled in order for you to later be able to generate a mesh of the tracked scene.
Next, just press the Autotrack (Heavy) [7] button and the heavy autotracker will begin using the settings you have chosen. Note that you can see the progress of the operator live in the progress panel at the top or inside Blender's system console. You can also cancel/stop the current process by going into the system console and pressing Ctrl+C.
Mesh Generation
If Undistort (C [3] /S [5] ) and High Quality Dense (C [6] /S [6] ) are enabled, you can also generate a mesh. The Mesh Quality setting (C [27] /S [8] ) offers four presets: Low, Medium, High, and Ultra. Higher settings produce finer meshes but require longer processing times. Then you can press Generate Mesh (C [28] /S [9] ) and it will use the current dense point cloud and the mesh quality setting to generate a mesh.
Important: The quality of the mesh is entirely dependent on the input dense point cloud. If the dense point cloud looks poor, adjust your earlier settings and reset the folder before generating the mesh again.
Conclusion
The Heavy panel gives you complete control over the tracking and reconstruction process. In most cases, using Simple mode with the General Purpose preset provides a good balance between speed and quality. From here, the next step in the workflow is the Point Cloud Cleanup panel, which helps clean up your newly created point cloud.
Click to enlarge
Point Cloud Cleanup Panel
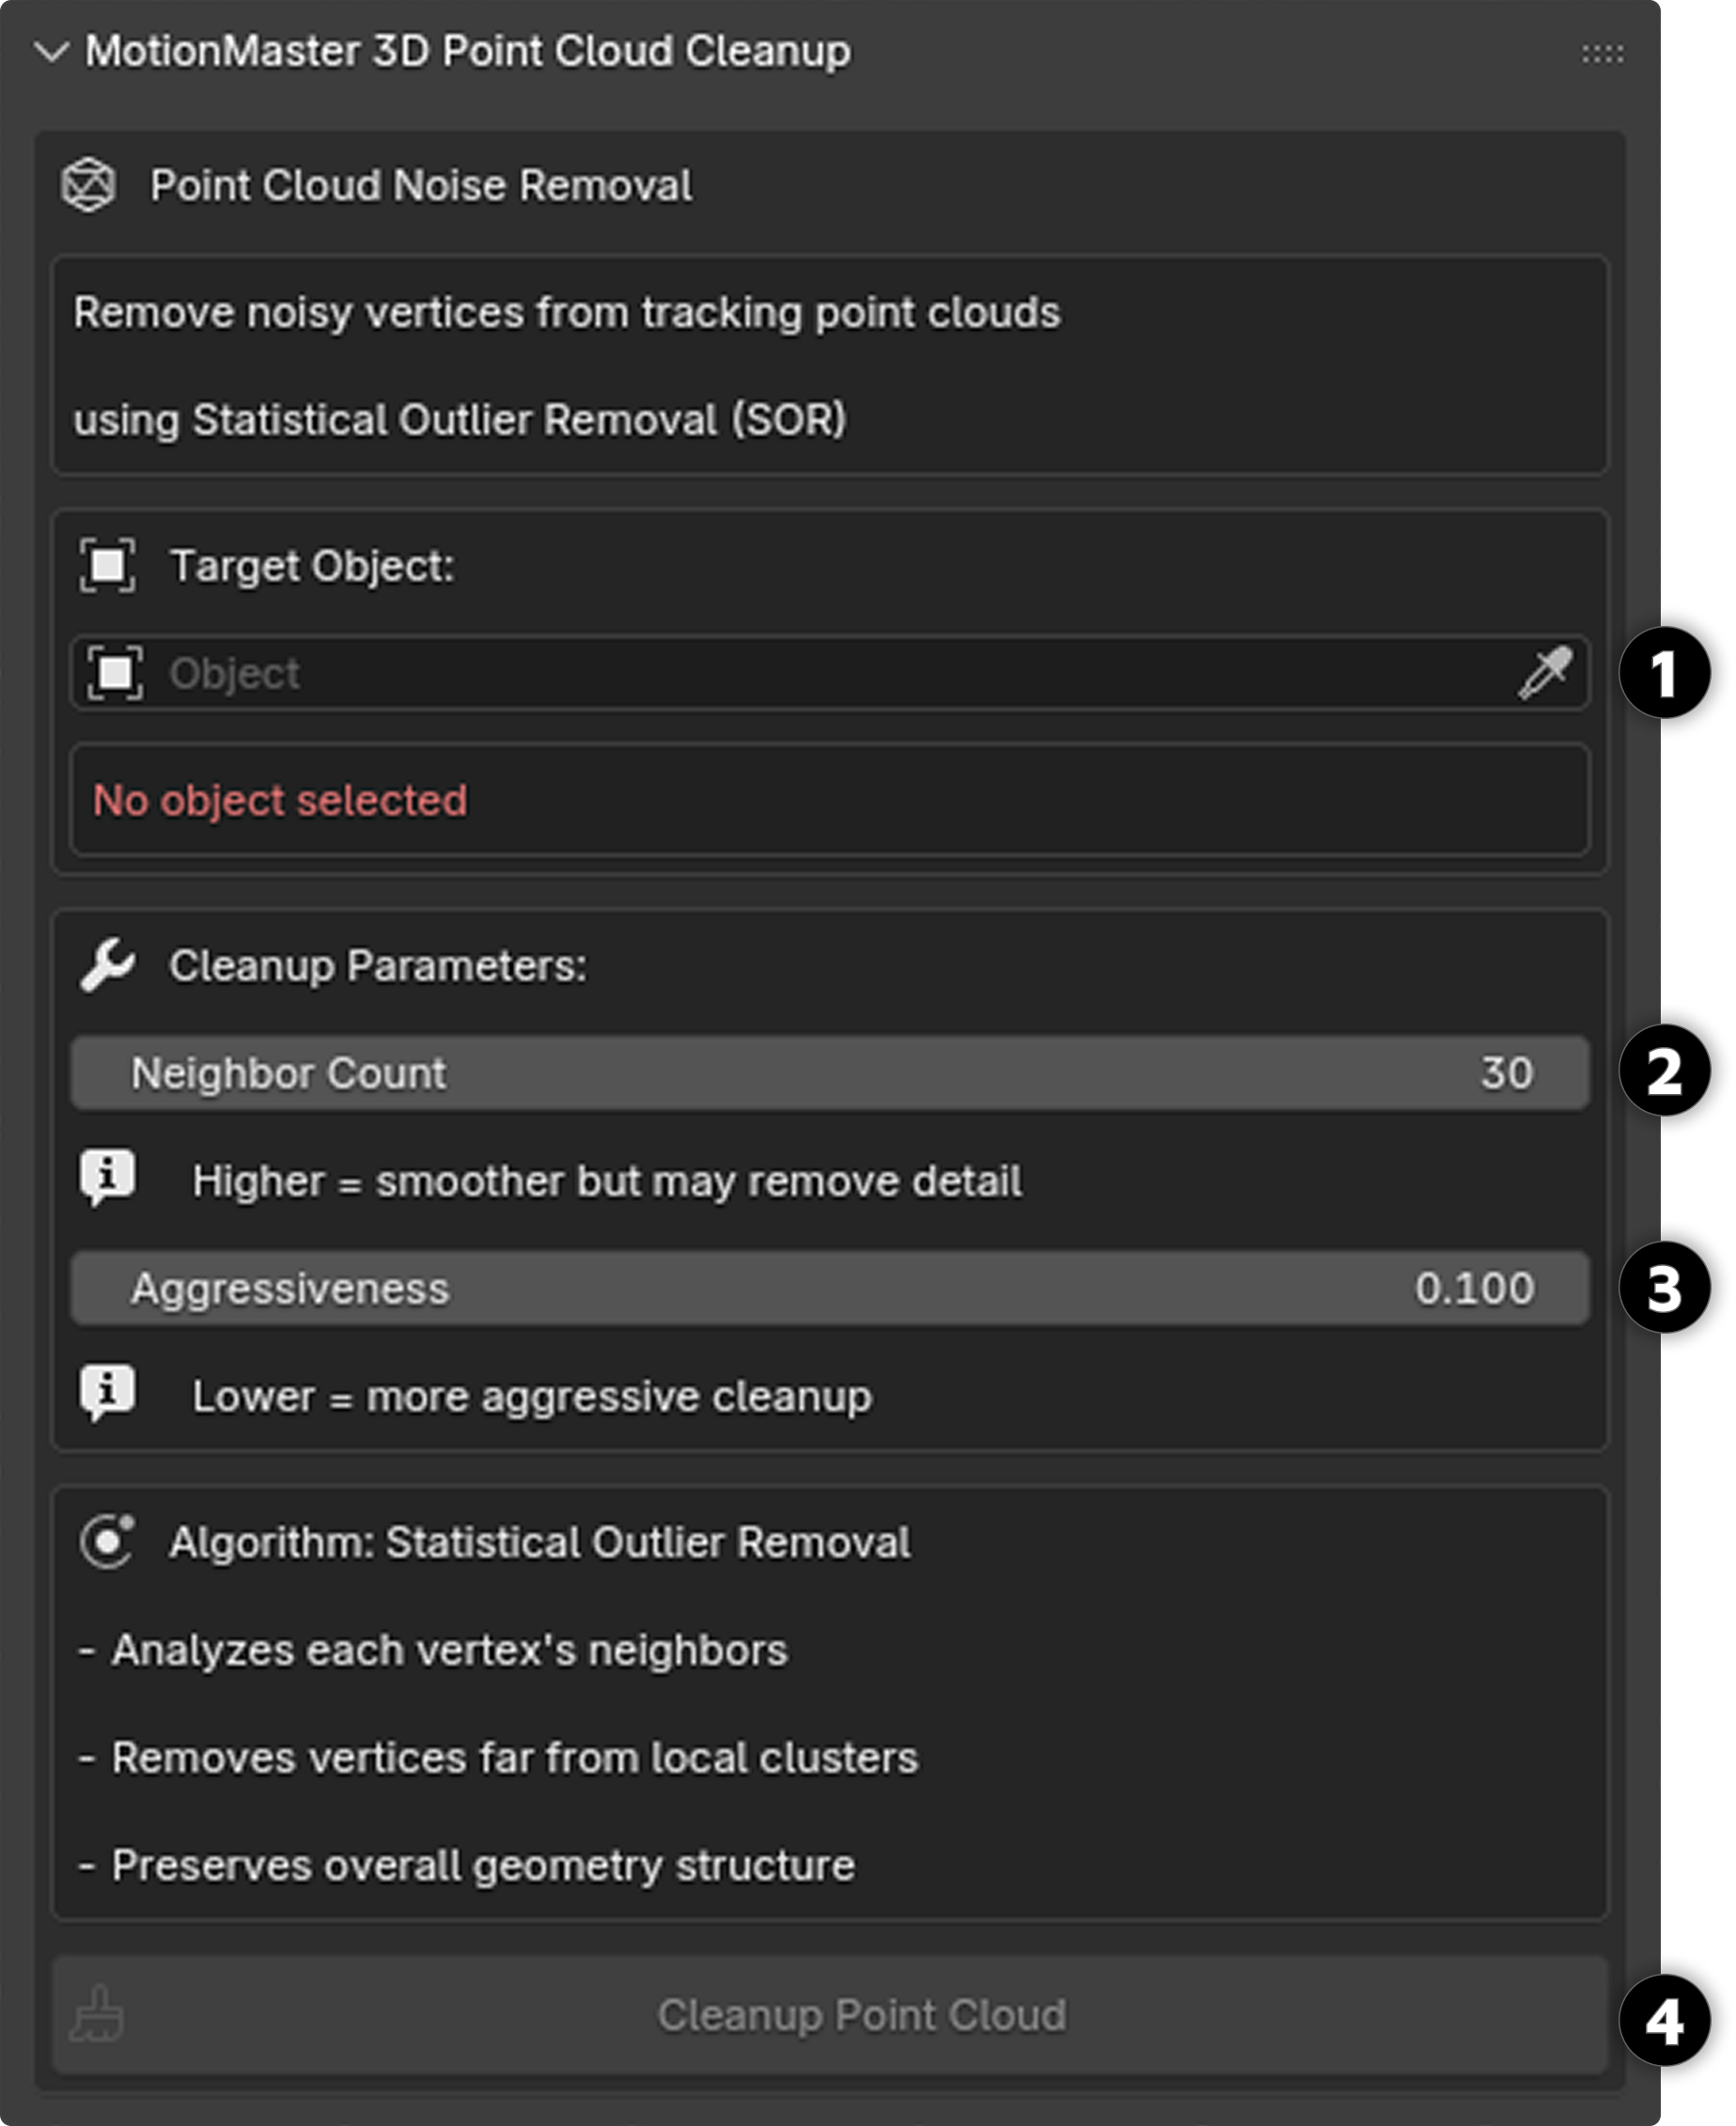
The Point Cloud Cleanup panel is a relatively simple panel. It is only meant to provide a simple way for you to filter out unwanted vertices in your point cloud. It uses a Statistical Outlier Removal (SOR) method, which generally works well.
Selecting Your Point Cloud
The first thing you do is reference your point cloud in the Target object box [1] .
Important: Make sure that you actually pick the point cloud and not the parent box of the point cloud.
Cleanup Parameters
Next is for you to decide the Cleanup parameters. These two settings control how aggressively the algorithm removes outlier points from your point cloud.
Neighbor Count
[2] Default: 30The first one is the Neighbor Count, which is set to 30 by default.
- • Higher neighbor count: Increases the smoothness but may remove details in your point cloud
- • Low value: Might not remove all the unwanted points
Aggressiveness
[3] Default: 0.1The next setting is the Aggressiveness setting, which is set to 0.1 by default.
- • Lower value: Makes the cleanup process more aggressive, meaning that it will remove more points
- • Higher value: Might not remove all the noise you want gone
Running the Cleanup
After you have played around with the settings, press the Cleanup Point Cloud [4] button, which will perform the filtration on your point cloud. Note that if you are not happy with the result, you can always press Ctrl+Z to revert your result and try different settings until you are satisfied.
From here, the next step in the workflow is the Aligner panel, which helps orient and align your tracked solution.
Click to enlarge
Aligner Panel
The Aligner panel is much simpler than the previous panels. It provides two main tools to quickly orient your tracked solution.
Floor Tool
The Floor [1] feature allows you to select a set of vertices and align them with the XY plane. When you click Floor, the parent object of the result is adjusted so that the selected points lie flat, effectively snapping your ground plane into place.
Flip Tool
If the orientation is inverted after applying Floor (for example, the ground points end up facing the wrong way), you can use the Flip [2] button. This flips the Z axis of the parent object, switching the orientation from -Z up to +Z up.
These simple tools make it easy to correctly orient your tracked scene without manually adjusting transforms. Just select ground plane points, click Floor, and use Flip if needed to correct the Z-axis direction.

Click to enlarge
Reset Panel
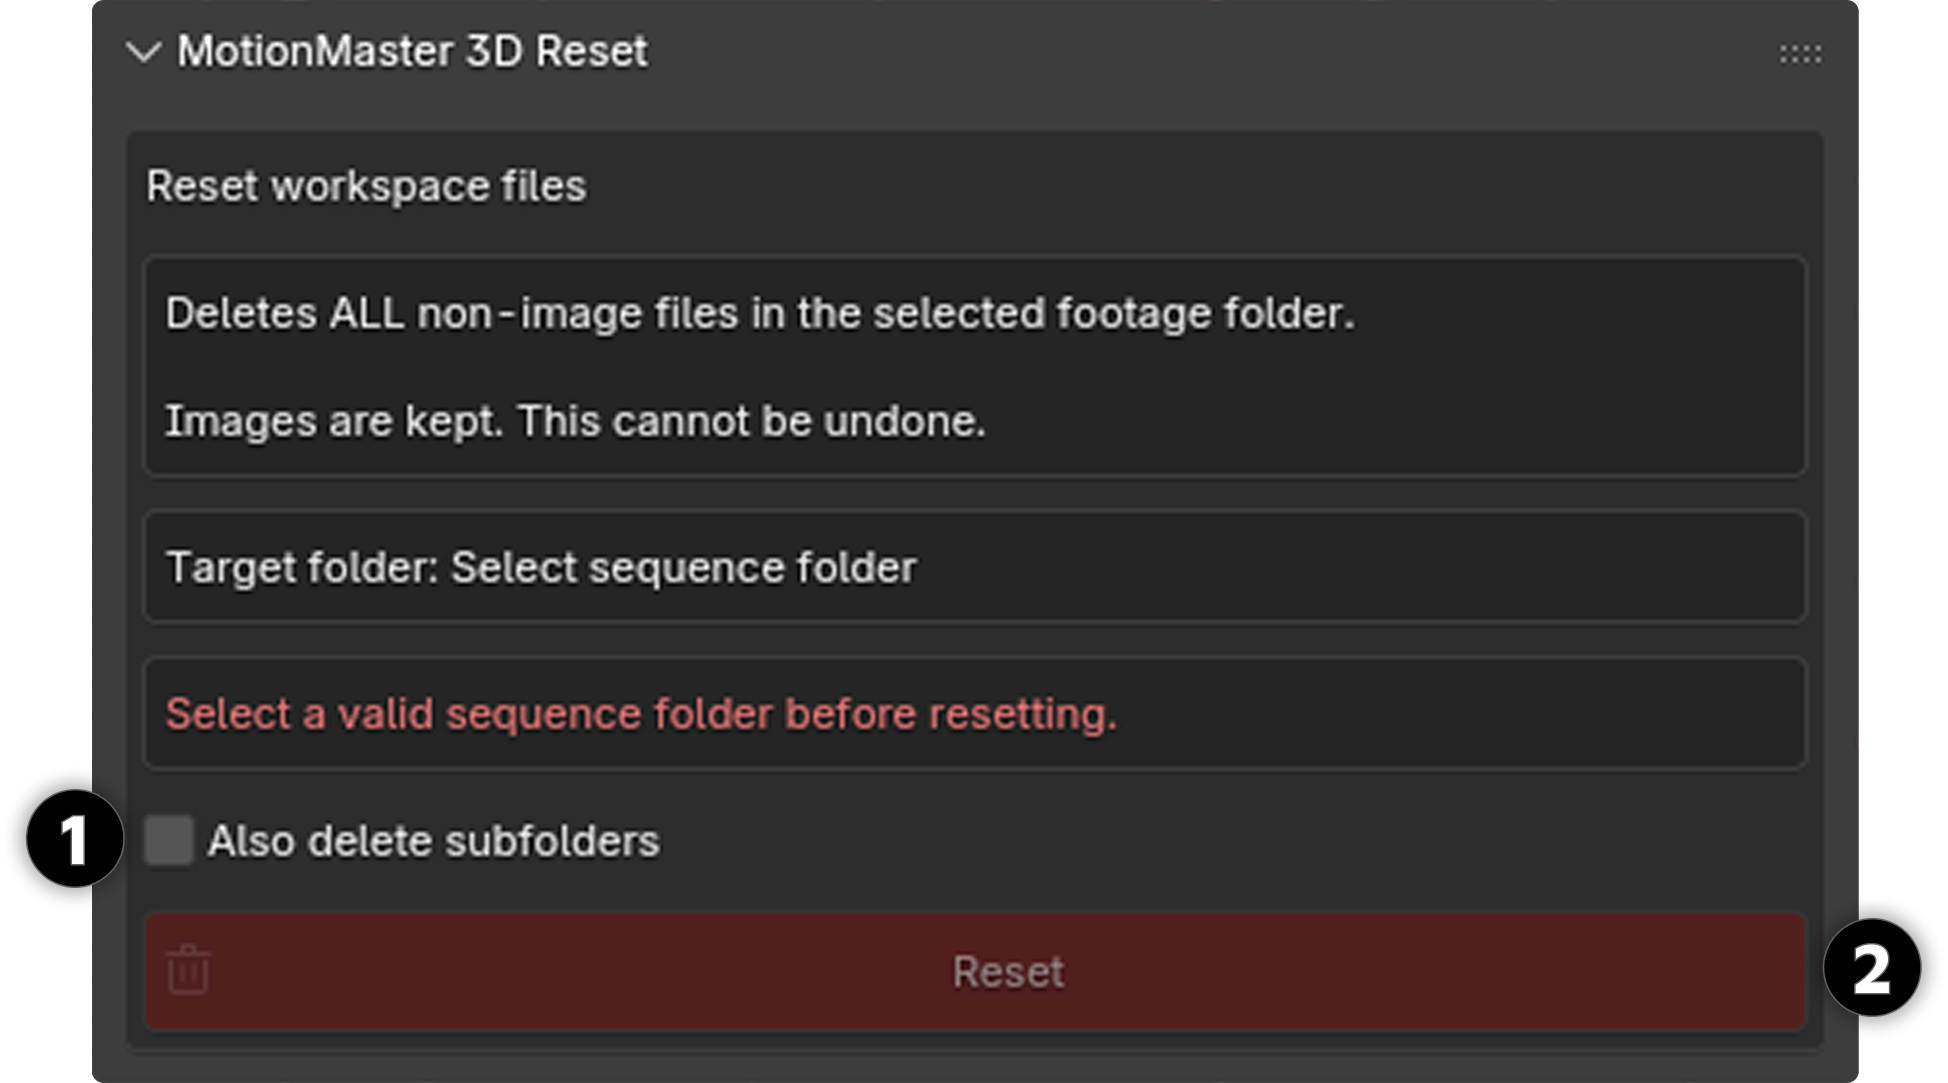
The Reset panel helps you clear out old tracking data from a specific folder while keeping your image sequence intact. Every time you use Quick or Heavy Autotrack in MotionMaster 3D, files containing 3D data from previous runs are generated. Over time, these can clutter your project folder and make it harder to iterate with new settings. The Reset panel makes it easy to remove this data so you can quickly start fresh.
Also Delete Subfolders
The first option is Also delete subfolders [1] . When enabled, the reset operation will not only remove files but also delete any subfolders within the current working folder.
Reset Button
The second option is the Reset [2] button. Clicking this will remove all files in the current working folder except for your image sequence. If Also delete subfolders [1] is enabled, subfolders will be removed as well, effectively erasing everything in the folder except your source images. If the Batch Mode [8] is enabled in the Select Footage panel, the reset button will perform the reset operation for all the folders currently active in the Select Footage panel.
Confirmation Dialog
Before completing the reset, a confirmation dialog will appear listing all files scheduled for deletion. This gives you the chance to double-check and either proceed or cancel the operation, preventing accidental loss of files you may want to keep.
Warning: Use this feature carefully. While you'll get a confirmation dialog, once you confirm the deletion, the files cannot be recovered. Always make sure you have backups of any important data before resetting.
Click to enlarge